What is Weblate?
Weblate is an open-source translation platform. You might want to use it if you have a project requiring the work of many people translating many strings into many languages. Some of its features include:
- A warning when a source string has been changed, but its translations haven’t.
- Beyond that, a warning system when certain things seem out of sync - maybe inconsistent punctuation at the end of the string, inconsistency with what interpolated strings are present, etc.
- Users don’t have to code or work with VCS directly, so nontechnical users can feel comfortable translating.
- A bunch of visualizations to help you see the current state of the project, such as % of strings that are translated in each component, links from one string to its other language variants, etc.
- The ability to attach screenshots to strings & also to see strings’ histories.
But it also has some disadvantages:
- As always with tools, added complexity when adding another component to your workflow (however, we won’t discuss this here; this guide is only about using Weblate as a translator, not as an admin).
- The UI/UX of Weblate is abysmal.
I don’t say the second point lightly. Weblate is one of the most confusing UIs I’ve ever used, and there are so many things that are awkward or impossible to do. The styling is also terrible, making visual elements hard to tell apart and sometimes being actively misleading (for example, a disabled text field next to an editable one have no styling differences).
What to expect
As I said, this guide will not talk at all about installing, administrating, or integrating Weblate into your source control. I’ve never done any of those things. However, I have used Weblate as a translator (really more as a UX text writer modifying source strings) on two large projects now, and I more or less understand how to do most things I need to do. So I will explain how to navigate Weblate.
I also have some custom CSS that you can use if you want. Feel free to use this CSS for any purpose, and attribution is not required.
Why so negative?
I’m never shy about my opinions of tools on this blog. But you might wonder why I’m being so openly critical of a FOSS project. Shouldn’t I be grateful for what exists and pass over its flaws? There’s a few reasons for my criticism.
- Intuition helps build understanding. Weblate’s flaws are user experience-centered, which means that it’s hard to have an inherent intuition for how to use the software. But if you understand the UX problems it has, then you can build a mental model that takes into account the issues with it & use it better. For example, if you see search bars all over the place that all behave differently, you might try to click one or the other and forget which one to use. But if you come in with an understanding that search is unintuitive, you’ll think a bit more before taking an action to search.
- Knowing not just that something is bad, but why and how to improve it, will help you make better design decisions yourself.
- I know most people don’t want to spend the effort to things like install local styles for websites.1 But Weblate really, really needs it. So, please use my custom CSS.
YearIn.LoL
As the example project, I will be screenshotting the YearIn.LoL Weblate instance. I’m not going to provide you with a URL to this instance,2 but you can try following along at the public Codeberg translation instance.3 I’ve been doing two tasks for YearIn.LoL:
- Writing source interface texts (i.e. the English values of keys)
- Translating to Pirate English
The workflow of translating to Pirate English is pretty much the same as translating to a “real” other language, although you tend to get a lot more warnings than you might otherwise because Pirate English is meant to be fun, and so you use a lot more exclamation points.4
YearIn.LoL is a League of Legends recap/rewind website, kinda like Spotify Wrapped but for League of Legends. It launched last year (in 2022), and this is my second year working with them. I’ve been doing strictly UI/UX work, mostly writing UX text. Have you tried grey-screening in League of Legends?
Welcome to Weblate
When you load Weblate, you’ll get a screen that looks like this:

- Click here to go to the project you want.
- A search bar to find projects, components, and users. It will NOT search for strings in your current project, but, frustratingly, this search is visible sitewide, and so you think you can use it for searching for strings in your current project. You cannot. Also, since most users are probably involved with only a single project, this search bar is completely useless after the first time you’ve located your project. So it should really be a search box on the projects page and NOT in the top bar.
- A list of projects you’ve contributed to (if you’re logged in). If you’re logged out, nothing will display here.
- I am not sure what gets a language listed here, but I think it’s ones you’ve edited a lot. But your source language will never be listed here. So, pretend this dropdown doesn’t exist. You should instead browse languages the way I will show you next.
Components & languages
When you click on your project, you’ll be taken to a screen that looks like this:
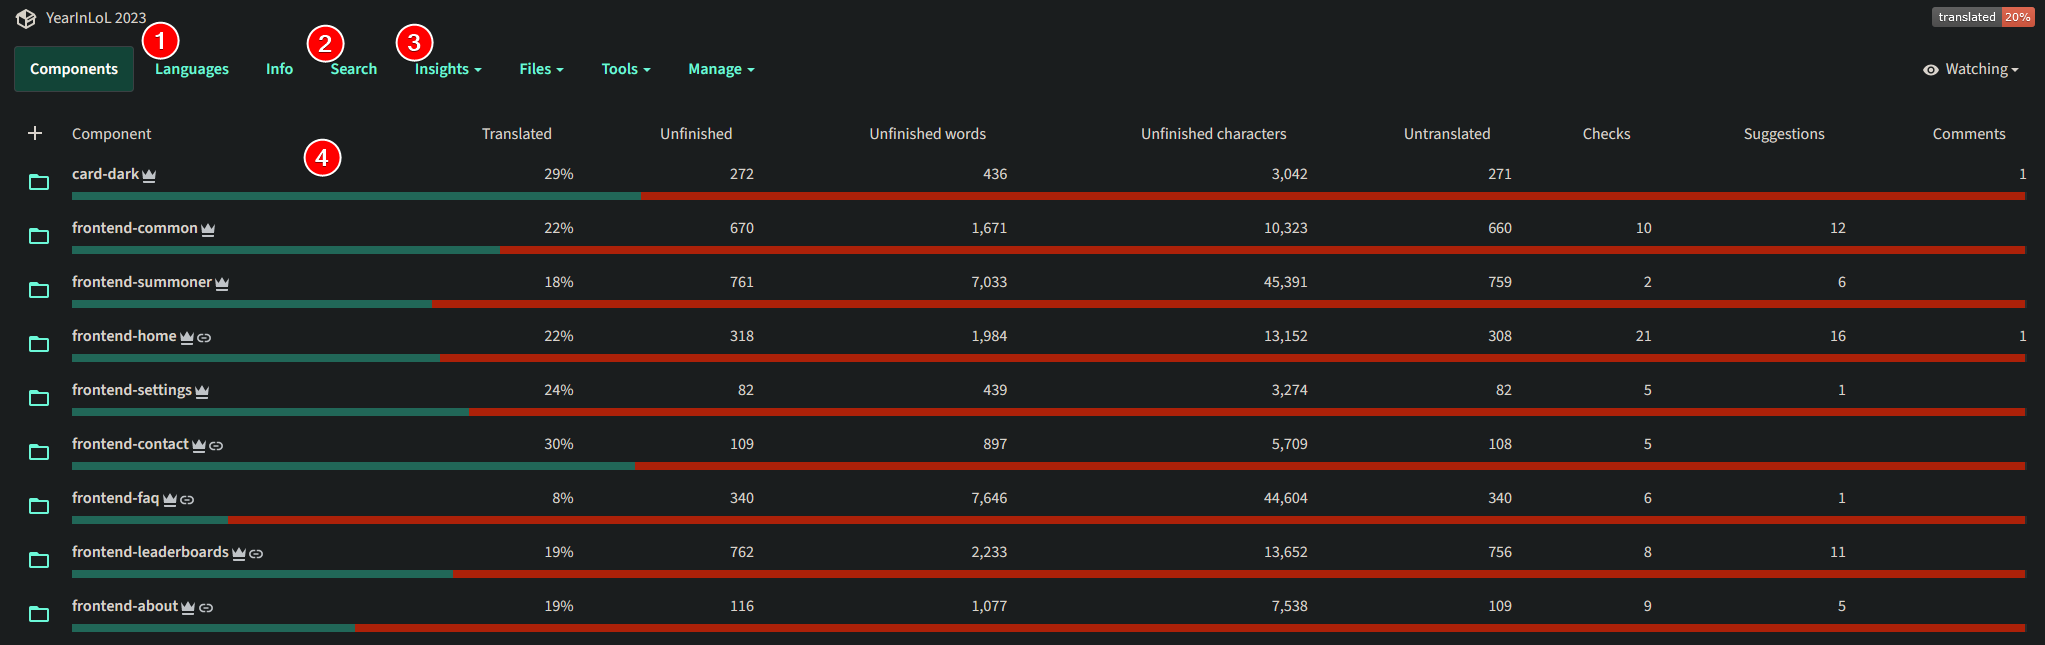
- This tab is how you should navigate between languages.
- This is how you search, NOT the box in the top bar.
- Most relevant, “History” lives inside “Insights.” I would organize this a bit differently, with “History” as a top-level button and the other things in the “Insights” tab under “Tools,” but yeah everything sucks.
- If you want to see history of a single language, do NOT click this link. Instead, go to Languages -> the language you care about -> Insights -> History. There is no per-language filter available directly from the global history screen.
- You can also look at the history of a single string by first navigating to its page, and then looking at its history tab.
- A list of components for the current project. The crown icon there means I’m an administrator.
What is a component?
A component should be a set of strings that need to be loaded at the same time. For example, in the YearIn.LoL project, frontend-common is loaded on every page, but frontend-faq is only loaded on the FAQ page. Your project may organize things differently, e.g. one page might have multiple components, or maybe two similar pages will be share a component.
Languages
There are two ways you can do things to navigate to the language of your choice:
- Go to the “Languages” tab above, select your language (you’ll get a URL like
/projects/yearinlol-2023/-/en_PI/), and then select a component. - Select a component now (you’ll get a URL like
/projects/yearinlol-2023/frontend-common/) and then select a language.
Even though the language selection in options 1 & 2 is happening at a completely different time, the screens are nearly identical:


- These breadcrumbs are the only way to tell what component you have currently selected (other than looking at the URL).
Regardless of which method you choose, you will then get a URL like /projects/yearinlol-2023/frontend-common/en_PI/ - in other words, if you choose method 1 then the nesting of the URL is opposite the action you took. Don’t get too confused.
Editing a component
As a warning, this is probably my least favorite screen in the entire platform. The reason is that the obvious CTAs are probably not what you want, and what you do want looks like some random statistics and not the most useful thing on the page. Oh, and the “Other components” section, which takes you completely AWAY from what you currently care about, is the most visually-striking thing on the page because of the brightly-colored progress bars.
Also, this is the screen from which you create new strings. The button isn’t visible in the screenshot here, because you can only create strings from the source language, so I’ll go over this separately in a later section. But keep that in mind.
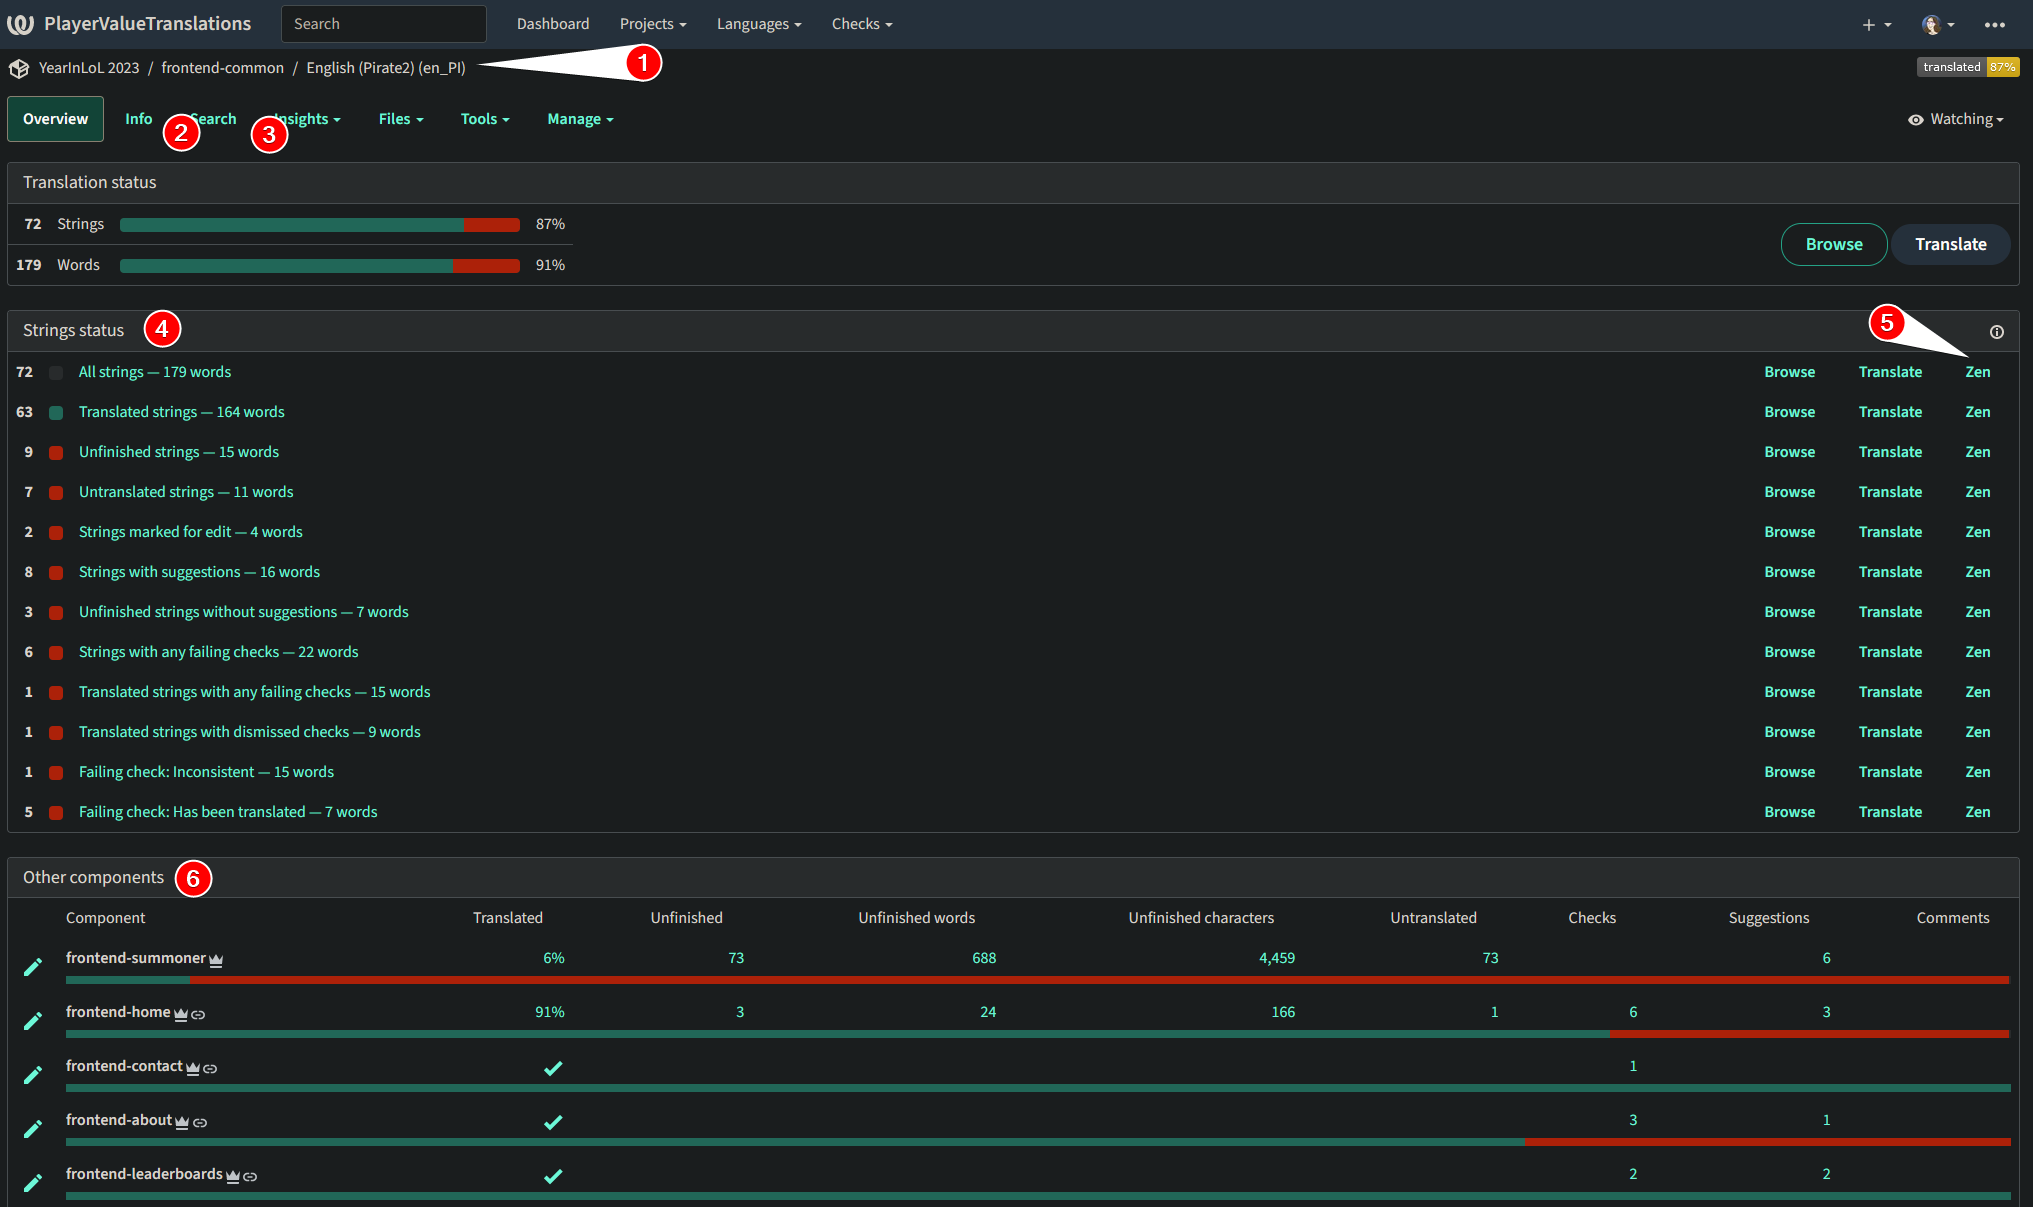
-
Pay attention to the breadcrumbs, because this is the only way to tell what component you’re currently on. Yes, there should be a large
h1that saysCurrently editing {component} - {language}or something. -
Search inside this component is here. Usually, this isn’t gonna be the search you want, because if you’re searching, likely you want the entire project. But YMMV I guess.
-
Again, history is here.
-
This is the list of useful links. Click the link in this column to what you care about right now. Probably you will care about one of:
- All strings
- Unfinished strings
- Strings with suggestions
But pick the ones you are most interested in. They take you to what they sound like they do, but having so many options is a bit overwhelming when you probably just want to see “everything” or “not-done things.”
-
This “Zen” link will take you to a nice screen that gives you a list of source -> translated for every string in this language, no extra info. You can click between input boxes to your heart’s content, and everything autosaves. This is also the best way to do a
Ctrl+F, although the content lazy-loads, so you will have to first scroll to the bottom. -
Kinda useless honestly. This entire UI element could disappear and the interface would be better, because you wouldn’t get distracted by something that’s probably irrelevant. But you can get to other components here.
There are a bunch of links and buttons that I didn’t call out here; that’s because I think they’re useless. But feel free to click around and see what takes you where.
Editing strings
Let’s assume you want to see a bunch of details about each string as you edit it, so you’re not going to use Zen mode. Then clicking on “all strings” from the component view will take you to a screen that looks something like this:
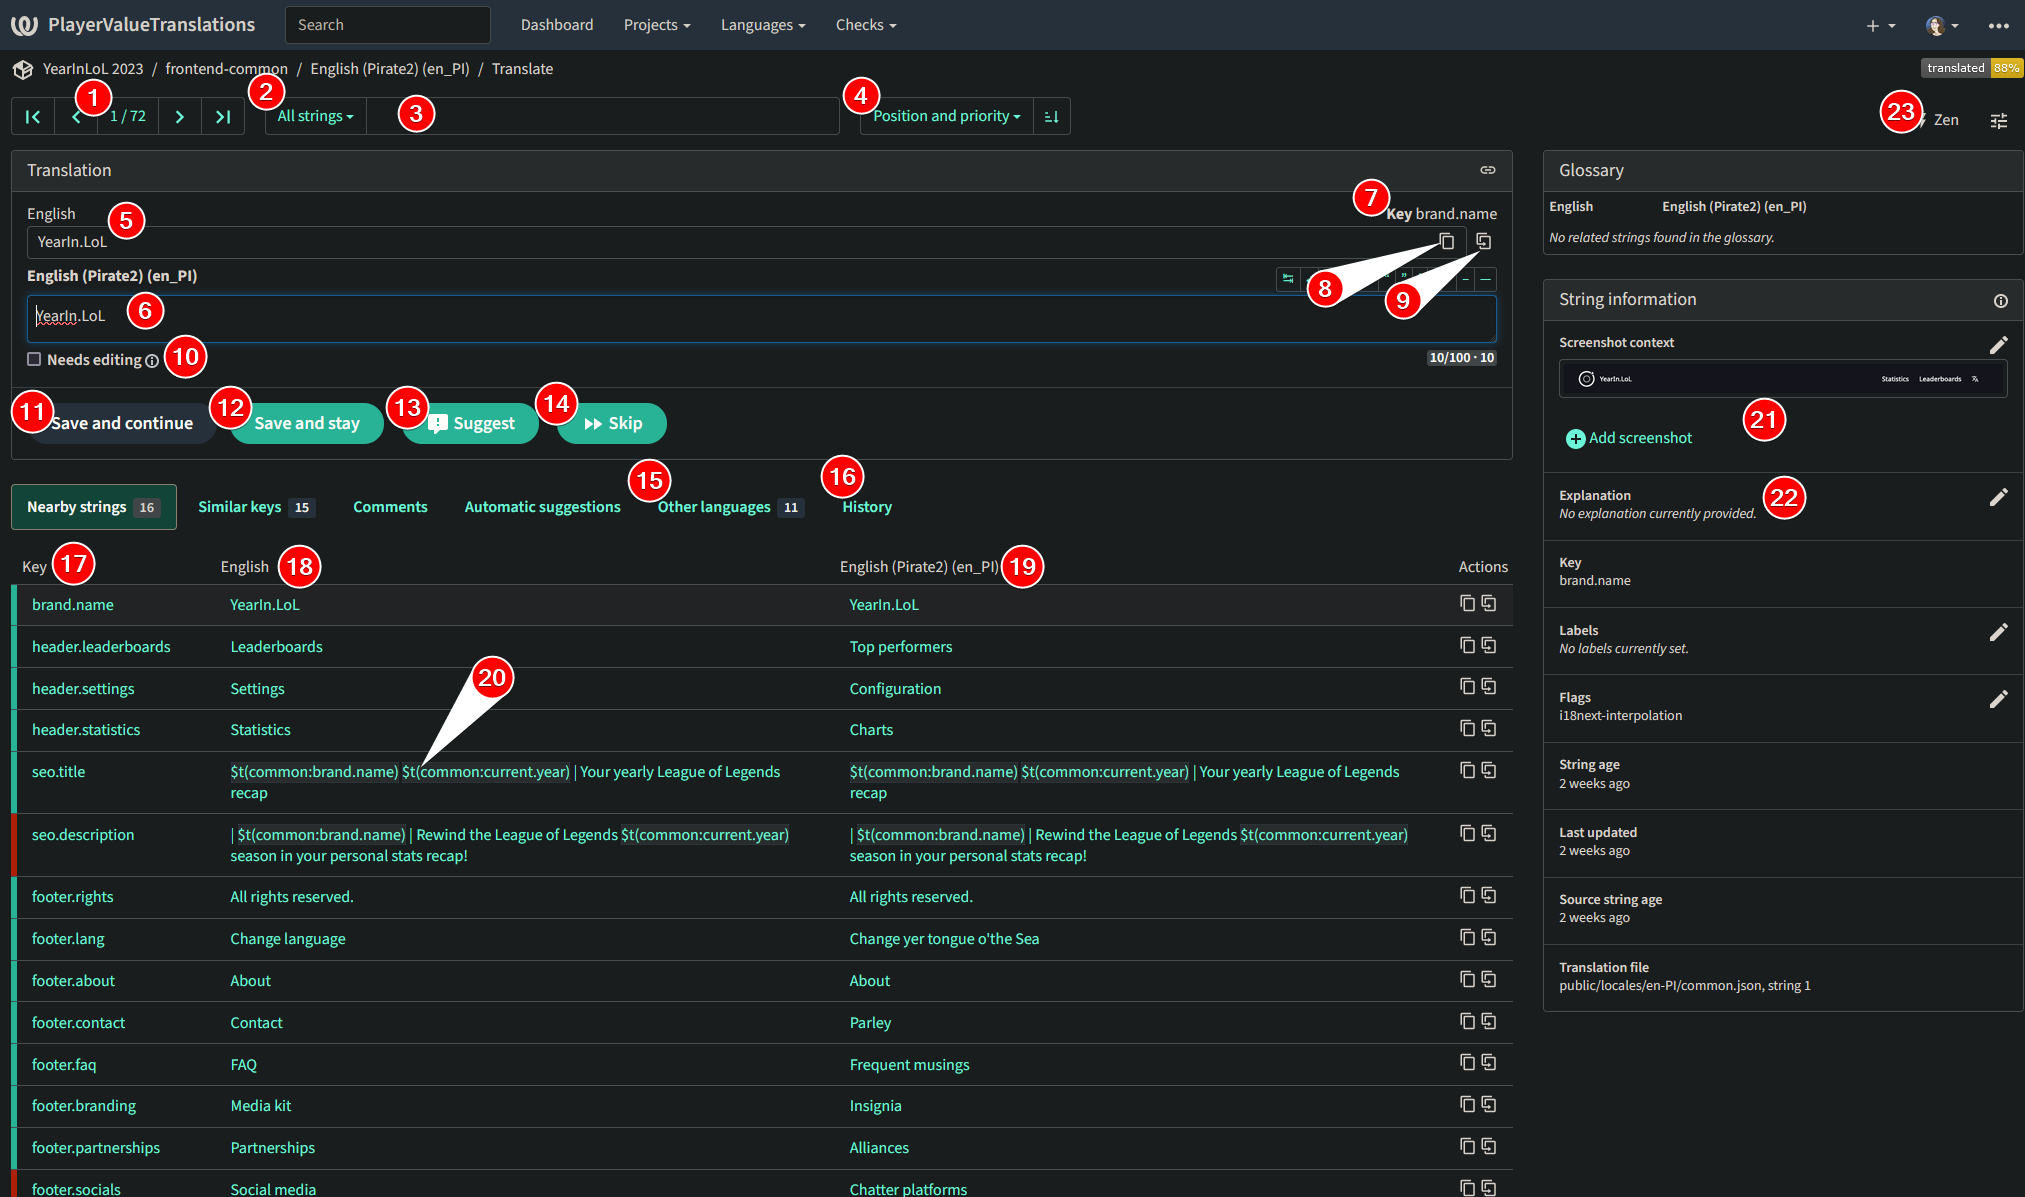
- Navigation buttons. All the way back to the front, back one, forward one, all the way to the end. These are not pages though, they’re individual strings. If you want to go to page 3 out of 5, well…pick a number that’s 3/5 of the way through your total number of strings and jump there. The shittiness of this navigation is a lot of the reason I prefer to use Zen mode.
- Filter to one of the same lists that were available in the component view. For example, instead of “All strings” you could look at “Unfinished strings” without going back to component view to select that.
- “Search.” In quotes because it’s not actually going to filter your view to what you type here; rather, it will jump to the first string matching your search, and then change the behavior of buttons 11-14 to only touch strings matching your search.
- Sort/reorder the strings.
- The English value of this key. You CANNOT edit that here, but fortunately the text
Englishis a link! Bet you couldn’t tell. One of the most important things I do in my custom CSS is to style this blue and underline it. - The current-language value of the string.
- The key. Another thing I do in my CSS is to left-align this.
- Copy English (source language) text to clipboard.
- Autofill the source language into the target language. If you click this, “Needs editing” will automatically get checked, and if you don’t think it needs editing you’ll also need to uncheck that box afterwards.
- “Needs editing” checkbox. You can filter for strings that need editing, so you should make use of this and actually mark things that need editing this way.
- Save the current value of the string & continue to the next entry in the list.
Ctrl+Entertriggers this action. Annoyingly, if you have just translated the last string in the component, instead of telling you this it kicks you out of this view and back to the last screen, where you select a list of strings from the component to translate. Very frequently I translate out of order, and this behavior drives me crazy. - Save what you wrote, but don’t continue to the next string. If you’re editing isolated strings, you should favor this button because you won’t get kicked out of your component constantly.
- Instead of saving, make a suggestion. Whether you want to use this or not depends on your role within the translation team. You can view strings with suggestions as one of the filters.
- Go to the next string in the component.
- See the values of this string in other languages. This can be really useful to quickly navigate between all languages and propagate a punctuation change, for example.
- See the history of this current string. This is the easiest way to see history imo.
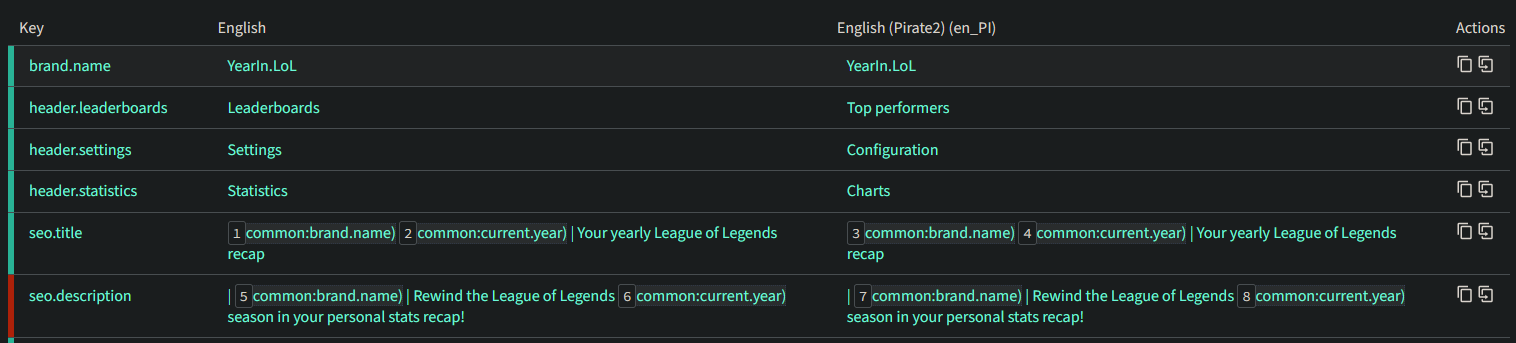
- A list of all of the keys. The color to the left will be teal if everything’s good, or red if there are warnings. Unfortunately, the warnings might pertain to a different language from the current one, e.g. if German has an error but Pirate English doesn’t, and you’re looking at Pirate English, you’ll see this in red.
- The English value of the strings in the component.
- The current-language value of the strings in the component.
- The one thing about Weblate’s UX that I actually like: If you click an interpolated value like this, it will fill that text into the text box (6). Also, you can do this via keyboard shortcut. Press
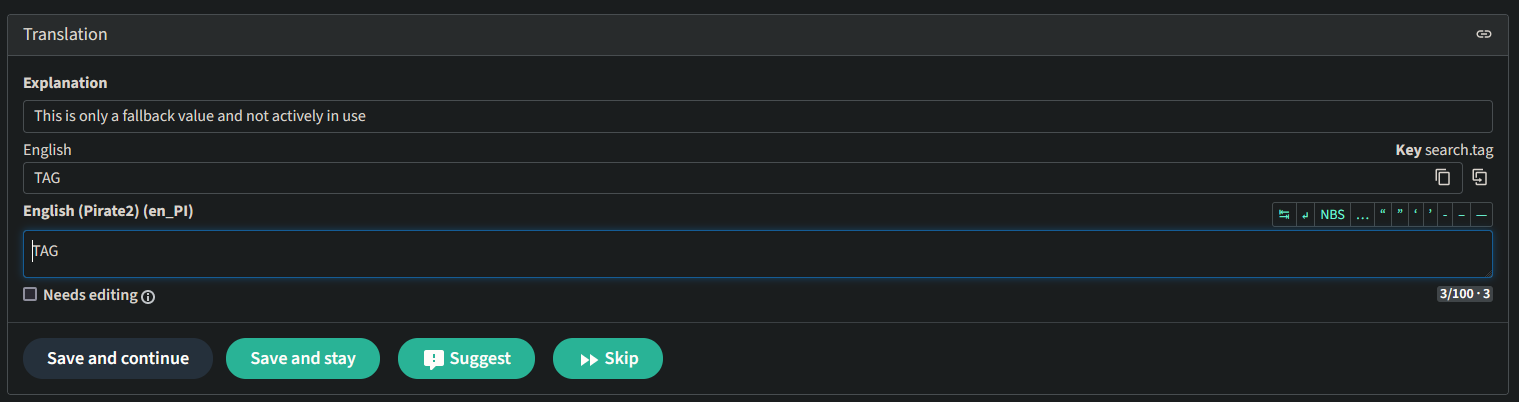
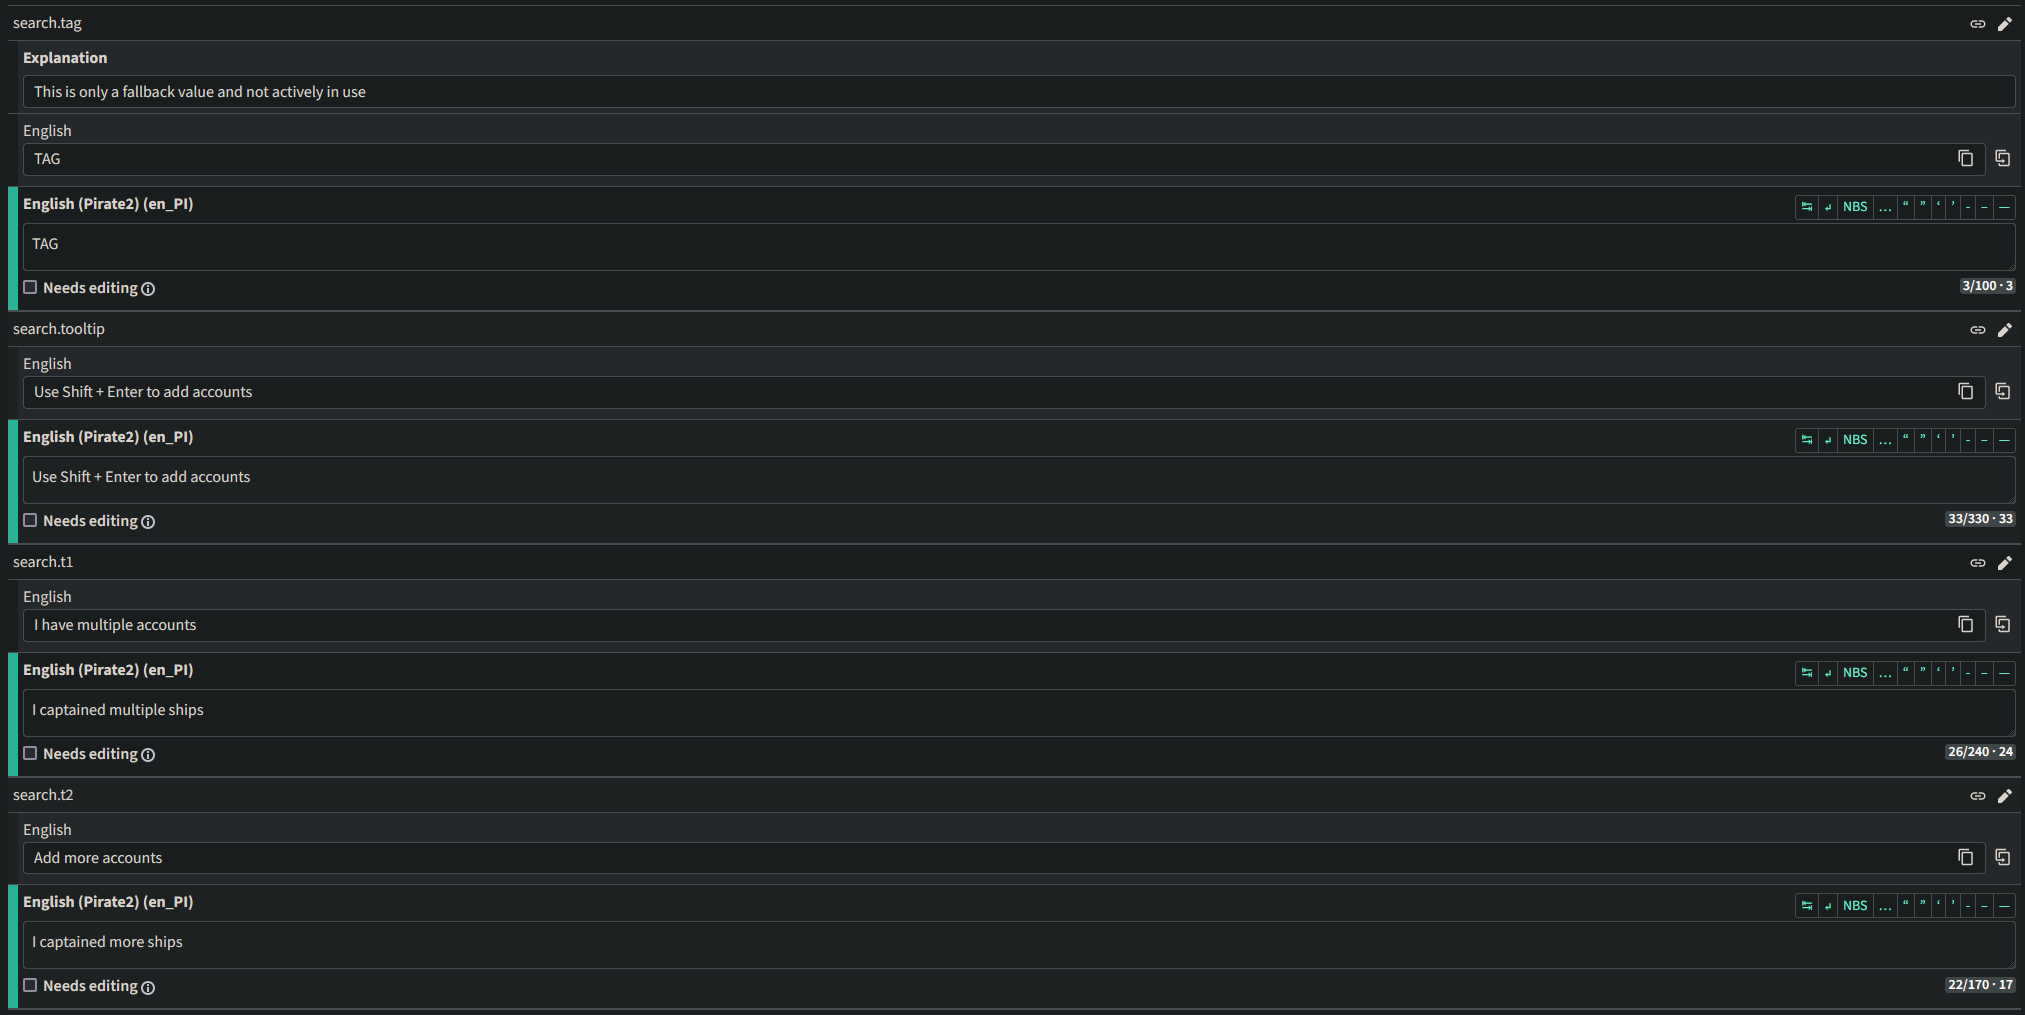
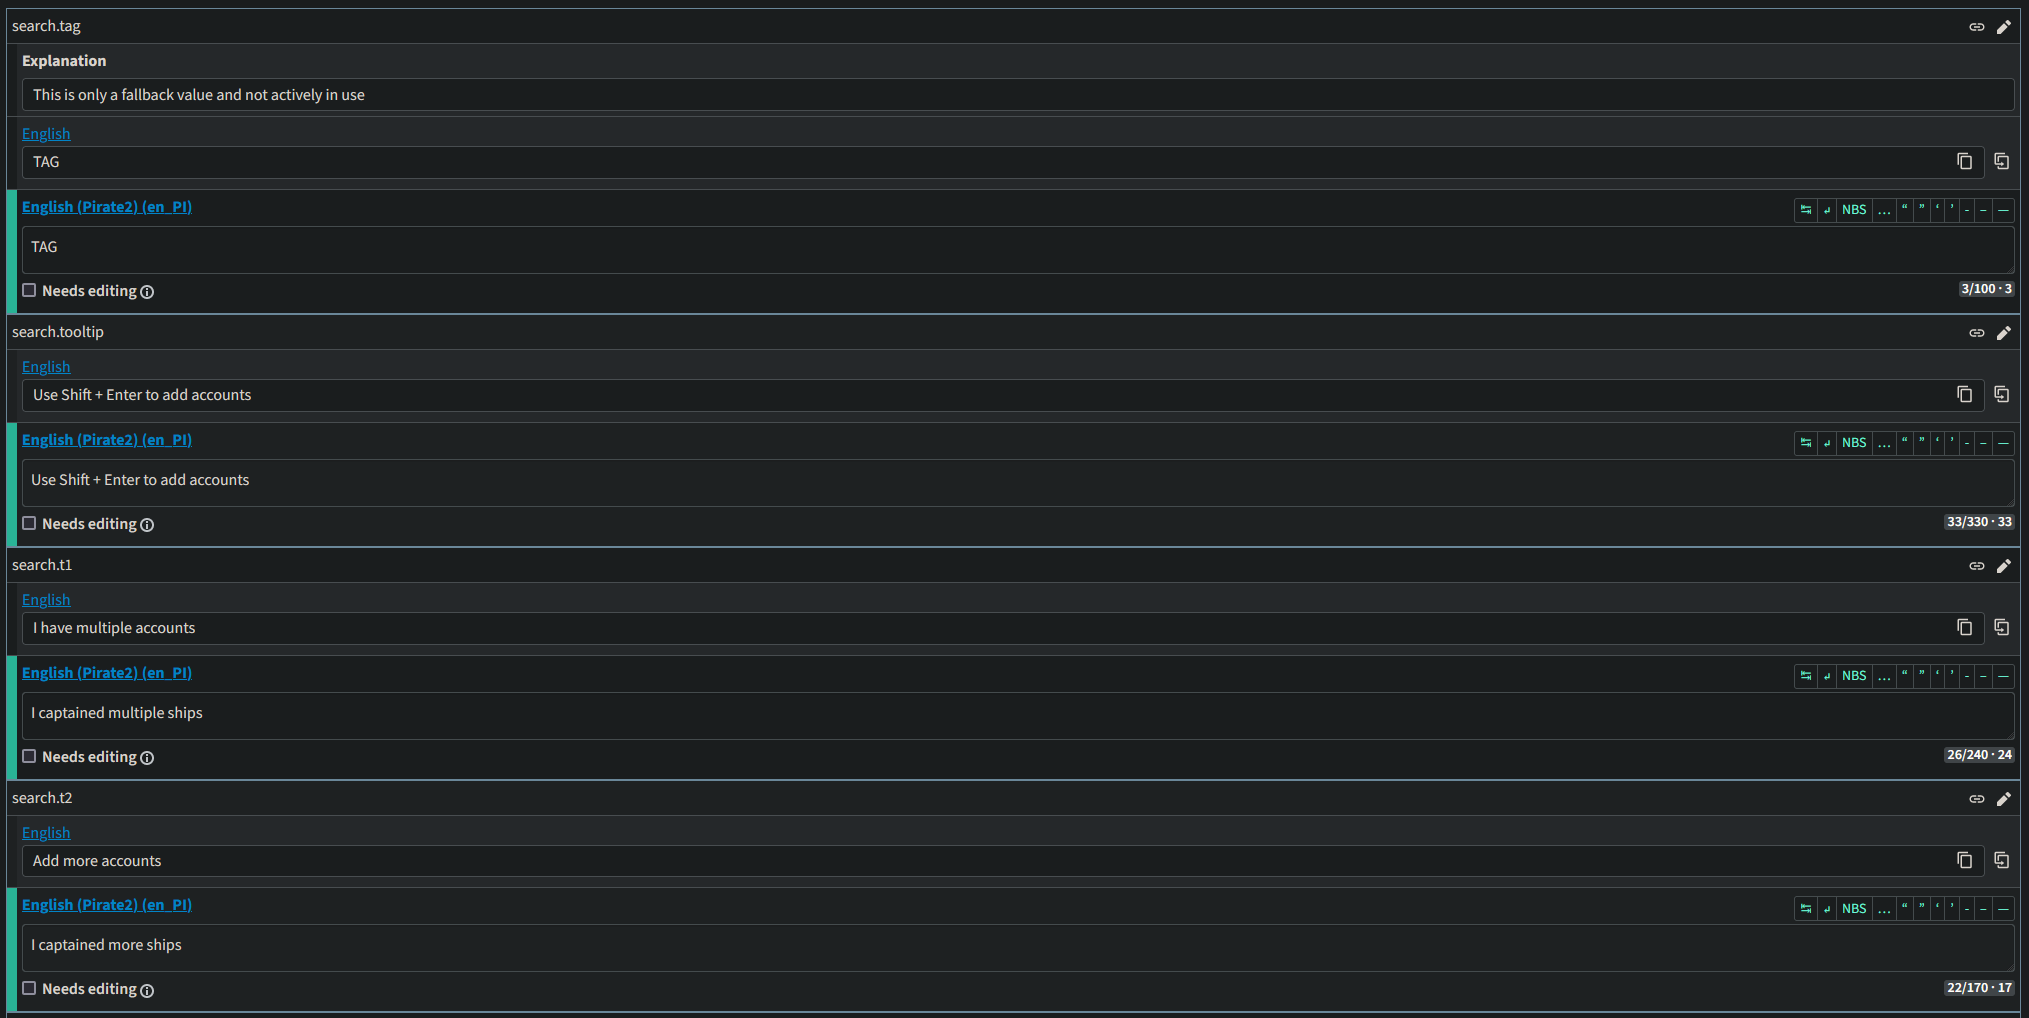
Ctrland then look at the number next to each possible interpolated value visible anywhere on your screen; then press the number that shows up next to the one you want. Super convenient, and I love this! - You can upload a screenshot showing where this component is used in the UI, which can help translators understand the context. If you want the screenshot to show up for every language, you must upload it to English (or the source language). If you upload it to another language, it will only show for that other language. And there’s no way to change what language a screenshot is uploaded to after you’ve uploaded it, you gotta do it right the first time.
- Optionally, you can write an explanation about the string. Confusingly, unlike the screenshot, you can do this from any language & it will show up for all languages. Although it says “Explanation,” a better name might be “annotation” - this could be any message you want other translators to read - a warning about what to hardcode or not, a list of allowed values for some piece of info that should be localized, or indeed an explanation of how the string is used in the interface or the mood that should be conveyed.
Also, please note that when you save an explanation, your unsaved changes to the string are reset without warning. I’ve lost and had to redo so many edits because of this.
Here’s how the highlighted numbers look when you press Ctrl, as described in (20):
And here’s how an explanation (22) looks when there’s one added:
Zen mode
First of all, a warning. If you get this notice:

Then it’s extremely likely you need to accept a CLA for this component. If the project has a CLA, then you need to accept it individually for every single component. Even if you’re an admin on the project. (Ask me how I know this.)
Zen mode is pretty self-explanatory once you know how the normal editing interface works. A couple notes, though:
- Strings autosave when you tab out of the text box. So, if you make a typo or something, you must fix it.
- The “Clone to translation” button ((9) above) here will NOT automatically trigger the “Needs editing” checkmark. TBH that seems like a bug to me; the behavior should be consistent, but it is what it is, and this inconsistency means that Zen mode is a great place to go if you need to copy a ton of strings to the target language (e.g. proper nouns, legal phrases, etc.)
- The default CSS here is AWFUL. You should really use my custom CSS or write your own to make the sections more visually distinct if you’re going to use it.
Here’s how it looks by default:
And with my styling:
These are the rules for this page (though keep in mind, I’m writing third-party unofficial CSS and if the DOM changes at all, this might stop working):
|
|
Creating new strings
Here is how you create a new string (this is part of the “editing a component” screen). You must be in the source language to see it.5

Haha, you might think. What a funny amount of over-emphasis, you might think. Wrong! This button is so incredibly hard to find when you are currently editing a string and not thinking about the UX design of the tool you’re currently using. So I am making a big deal about it so that you don’t forget.
In my CSS, I change the background color of this extremely-invisible button like so:

And then I can find it. Usually.
Screenshots
Let’s look at the process of uploading a screenshot. You need to know two things and not mess this up at upload time:
- Screenshots should be uploaded from English (or your source language, if different).
- Screenshots are only available within a single component. Upload them to the right place!
To add a screenshot, go to a string shown in your screenshot (again, in English!) and click the Add screenshot button ((21) above). Then you’ll get a modal that looks like this:
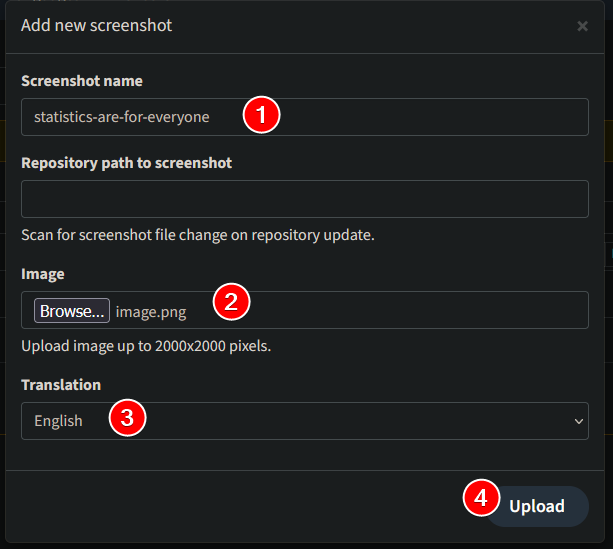
- Give the screenshot a name that’s reasonably descriptive.
- Browse for the image on your local filesystem. Sadly, you cannot paste from clipboard.
- Make sure this says your source language unless you want the screenshot to only show up in one single language!!
- When you’re done, click “Upload.”
I don’t know what “Repository path to screenshot” does.
Upon uploading, you’ll be taken to a screen that looks like this:
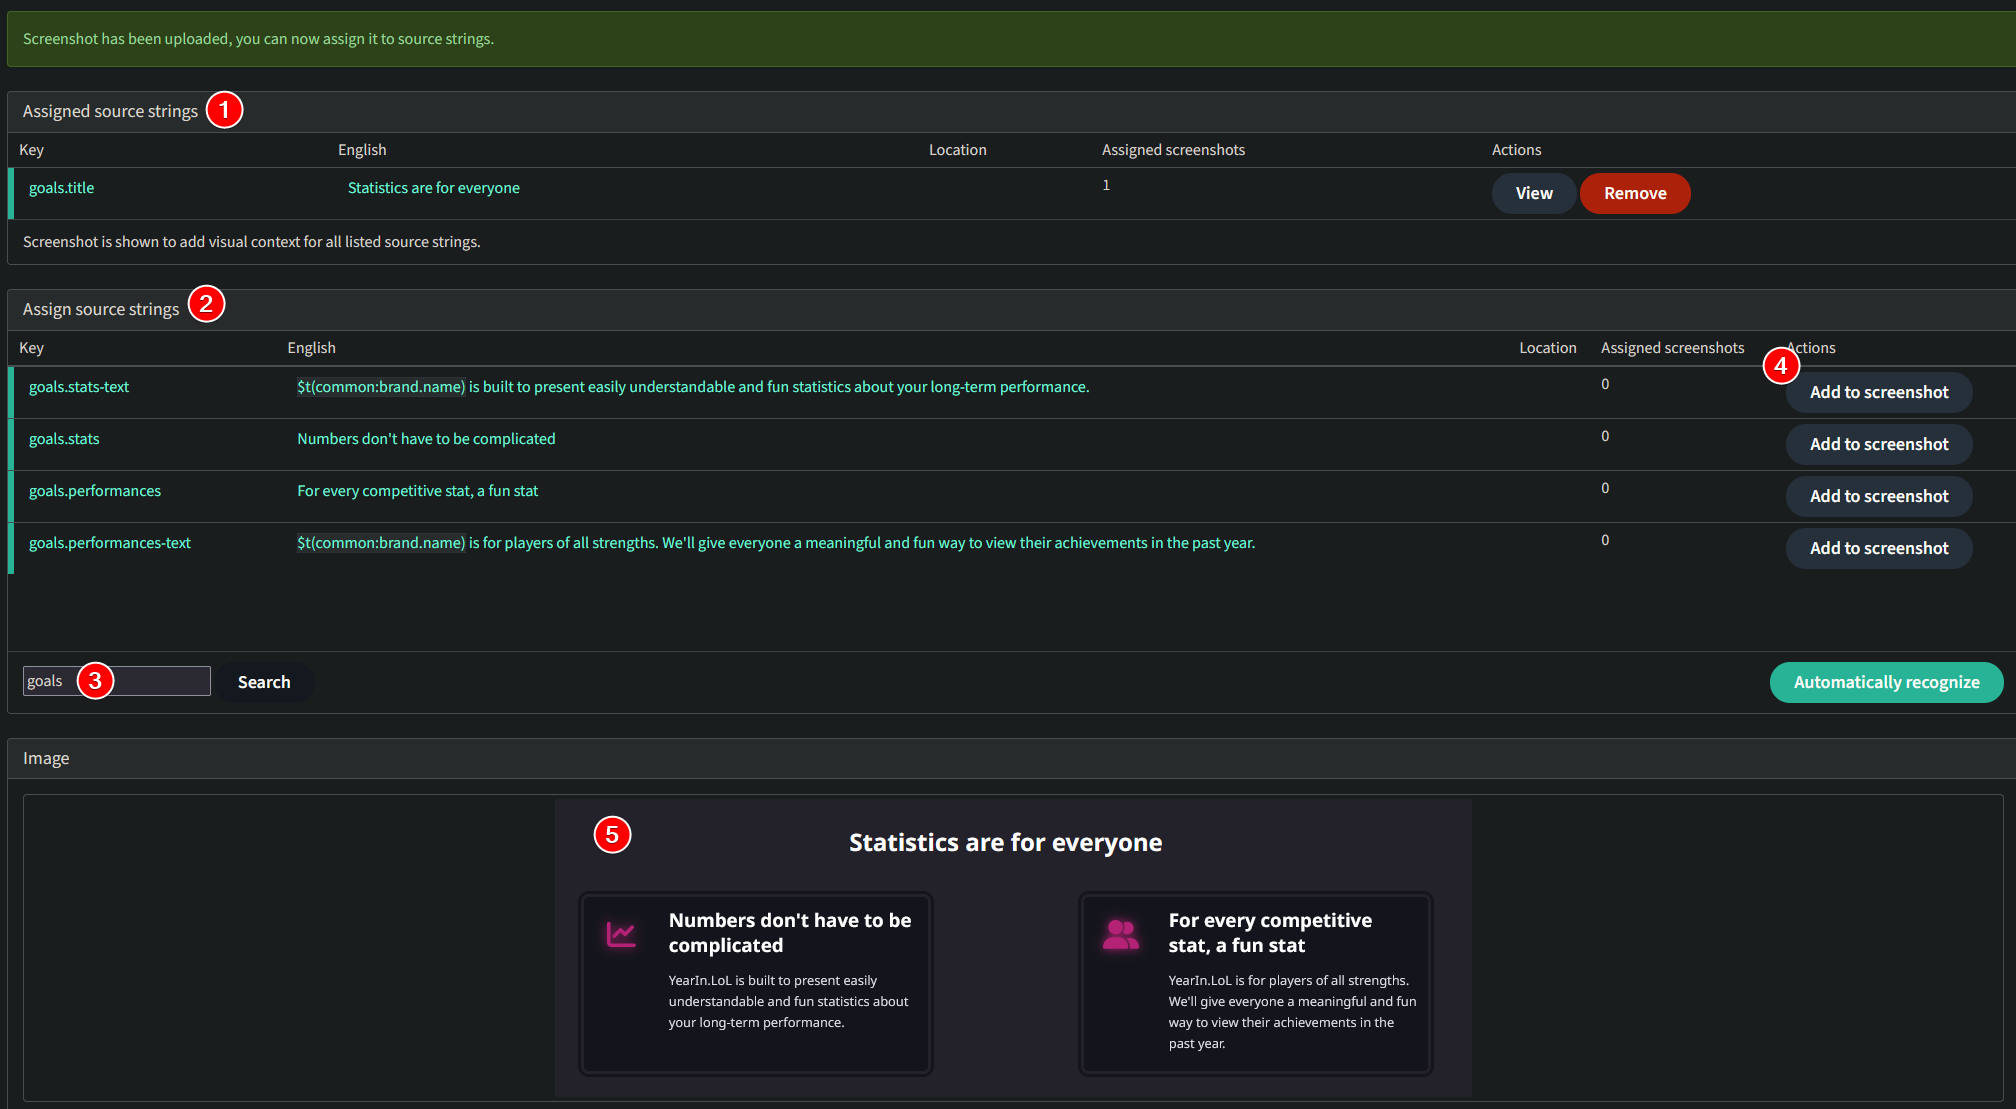
- A list of the strings already assigned to the screenshot. It will automatically contain the string that you were focused on when you uploaded the image.
- If the screenshot only shows a single string, no need to do anything further. But it’s likely your screenshot will be showing a couple strings, and you’ll want to tag all of them. That’s what this section is for.
- Search for other strings in the component to tag here. Hopefully, you’ve used hierarchical naming like we have here, and you can search for all of the strings easily. If not, and you want to list every single string in the component, you can leave this field blank and then click “Search” and everything will show up.
- Click
Add to screenshotto tag these strings to this screenshot also; the screenshot will show up for everything you tag this way. - A preview of the image you just uploaded.
If you scroll down below this, you can rename or upload a new version of the file. The only thing you can’t do is change what language it’s assigned to.
History
As mentioned earlier, if you want to see the history of a single language, make sure you go Project -> Languages -> (pick a language) -> Insights -> History, and NOT Project -> Insights -> History -> (try to filter by language, you can’t).
The history screen is also a little confusing to navigate, so I’ve made an overly-detailed diagram of what you may or may not see:
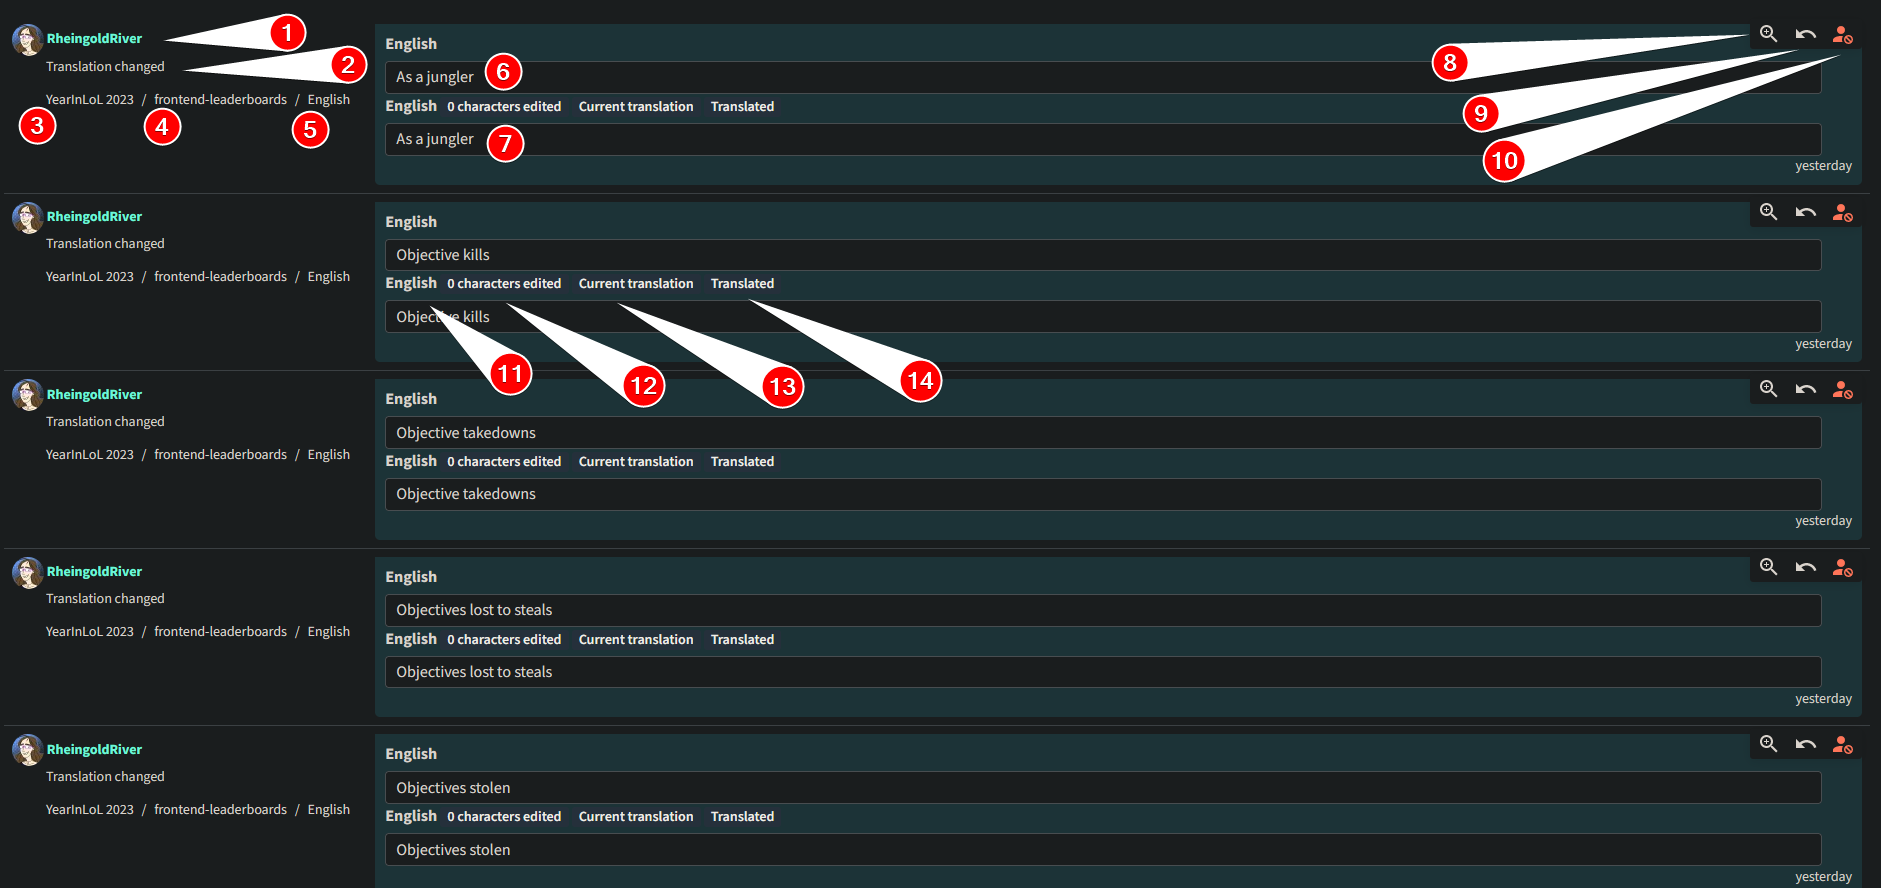
- The author of the change.
- The type of action (for example, “Changes committed” or “Marked for edit”). It’s a very extensive history.
- A link to the project overview.
- A link to a list of all languages for this component.
- A link to this specific language for this component.
- Old string.
- Note, this field is read-only.
- New string. In this case, it says “translation changed,” but actually you are seeing a log of me un-marking strings as “Needs editing,” so there is no change here. For some reason this action doesn’t get its own tag.
- Note, this field is also read-only.
- This is the most important link on the page!!!!! It is a link to the string in question, where you can actually make changes.
- Revert the change.
- Ban the user who made this change (only really applicable if you’re an admin on a public OSS project).
- Restates the name of the language.
- Size of the diff.
- NOT a link, rather it tells you if this change is the current version. And don’t expect to see “Outdated translation” or anything like that if it’s not current, this just won’t show up and you’re expected to note its absence.
- Honestly I have no idea what this indicates. But, it’s also not a link.
As you may have guessed by now, I wrote some CSS to make this UI clearer:
|
|

Help, my link isn’t working!
A common problem in Weblate is that you will link a string you’re editing to a teammate, and then they’ll say “this link doesn’t work” or “did you really mean to link to this string?” And you’ll say “but it works for me,” or “huh? no, that’s not the right string.”
What you’re encountering is that Weblate doesn’t exactly do permalinks…instead, it gives you a query string containing the current query & the offset. And if you modify the results of the query, then of course the offset can change.
So if you’re currently sorting by unfinished strings, you might get a search URL like ?q=state%3A<translated&offset=4. But, you’ve been going through the unfinished strings and translating them. So by the time your teammate opens the link, either there are fewer than 4 untranslated strings (in which case you’ll be redirected to the component overview) or the 4th untranslated string is now what used to be the 11th one. So your teammate sees something completely unrelated to what you’re talking about.
How to fix this
Well, you can’t fix this perfectly; the direct link to a string will always depend on its position in some list, and if you delete an earlier key, then the link changes. But assuming you never delete any string, then this method should always produce a permalink:
- Filter the list however you like (for example, by “unfinished strings”).
- When you are ready to link to a string, focus the “Nearby strings” tab at the bottom of the page.
- Find your current string in that list.
- Right-click on the key, and then “Copy link location.”
- The link you copied should end in
&sort_by=-priority,position- that means that you’re free from any filters other than the time the key was uploaded. - Paste this link to your teammates or documentation.
- Always accompany this link by a screenshot of the key you’re talking about, just in case something goes wrong.
Conclusion
I really hope that this guide gets out of date, because that would probably mean Weblate’s UI/UX has improved. That said, I’m not sure that I’ll maintain this (annotating this many screenshots is a lot of work), so if something here seems wrong, trust the software and not this post.
-
Even though my favorite thing in the world is to customize the UI/UX of the software that I use. ↩︎
-
And yes, I do have permission from the project owner to share screenshots publicly. ↩︎
-
Codeberg is a version control platform, like GitHub or GitLab. It’s where the /kbin project hosts its translation. ↩︎
-
And because Weblate is terrible, you can’t turn off certain warnings for one language, so if we want them for other languages, we need them for Pirate English too. ↩︎
-
If you are 100% sure you are in the source language and in the right place, and you still don’t see the button, you might lack permissions for creating new strings, so contact your project admin about that. ↩︎