Say you have an image with a transparent background and you want to paste it onto another image using PIL (really the fork Pillow). How can we do this?
I’ll explain the question in detail first, so that we’re on the same page, but if you’ve been googling this for hours and are impatient, the answer is:
1
|
new.alpha_composite(border_file, (0, 0))
|
But before I learned how to do it that way, I learned this solution, and this blog post is going to explain this solution in depth:
1
|
new.paste(border_file, (0, 0), mask=border_file)
|
Thanks to this StackOverflow post for providing me with this solution.
The question
We have an image that we want to layer on top of an existing image in PIL. In my case, I wanted to apply borders on top of an existing set of layered images, with their own masks. Here’s an example such image:
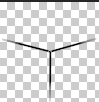
And we want to paste it on top of a file that we’ve already generated like this:

Here’s what the result should look like:

The naive way to paste the border image is like this:
1
2
3
4
5
6
7
8
|
border_image = BORDER_FILE_PATTERN.format('DLR')

# snip out some logic about deciding which border file to use, depending
# on what colors the card has

border_file = Image.open(border_image).resize((DIM, DIM))
border_file = border_file.convert('RGBA')
new.paste(border_file, (0, 0))
|
then we get this:

Wait a sec, that’s not what we want, at all!
This leads us to the question: How can we paste a transparent-background image on top of a solid-background image, and get the right output?
The answer, and an explanation
You may be expecting the answer, because I already told you, and that’s to use alpha_composite instead of paste, like so:
1
|
new.alpha_composite(border_file, (0, 0))
|
But for the rest of this post we’re going to understand how to use a mask:
1
|
new.paste(border_file, (0, 0), mask=border_file)
|
But why does this work? This seems pretty magical. You write the file name twice instead of once and everything “just works”?
What is a mask?
Actually, in this same program, we used another mask. Here is the input image for this section:
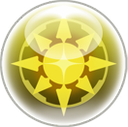
I don’t want to go too much in detail about it now, because creating it was in itself worthy of a separate blog post, but here’s how the creation of our mask looks:
 1
 2
 3
 4
 5
 6
 7
 8
 9
10
11
12
13
14
15
16
17
18
19
|
DIM = 76
R = DIM / 2
degrees = 15
A = degrees * pi / 180
ATTR1_PATH = [(0, 0), (R * cos(pi - A) + R, -R * sin(A) + R), (R, R), (R * cos(A) + R, -R * sin(A) + R), (2 * R, 0),
              (0, 0)]


def make_mask(path: List[Tuple[float, float]]) -> Image:
    """
    :param path:
    :return: a mask to use to make the thing transparent
    """
    poly = Image.new('RGBA', (DIM, DIM))
    pdraw = ImageDraw.Draw(poly)
    pdraw.polygon(path, fill=(255, 255, 255, 255), outline=(255, 255, 255, 255))
    return poly

attr1_mask = make_mask(ATTR1_PATH)
|
Notice that in make_mask() we are creating a full square with side-length DIM. Then we are drawing a polygon over only some of its pixels. Sound familiar?
If we comment most of the logic that creates the other three thirds then applying the mask looks like this:
1
2
3
4
|
new = Image.new('RGBA', (DIM, DIM))
new.paste(attr1_image, (0, 0), mask=attr1_mask)
new_file_name = OUTPUT_FILE_PATTERN.format(folder, elem, elem2, elem3)
new.save(new_file_name)
|
And after running the code we get this:

Does this really correspond with the area defined by the polygon path? It does, in fact we can verify it. Let’s run this:
1
2
3
4
|
new = Image.new('RGBA', (DIM, DIM))
new.paste(attr1_mask, (0, 0))
new_file_name = OUTPUT_FILE_PATTERN.format(folder, elem, elem2, elem3)
new.save(new_file_name)
|
And here is what we get:

Why is it not round? Recall our original image is a circle with a transparent background; in fact part of our mask is itself covering & preserving some transparent pixels 🙂
What have we learned?
- We can define masks and apply them when pasting images.
- When we do this, we’ll paste ONLY the part of the image behind the opaque pixels that are inside the mask.
- So if we use an image as both image AND mask, the transparent parts agree, and we’ll paste precisely its opaque parts. Tada! This is the magical solution we wanted. Now that we understand it perfectly, it’s not so magical, is it?
The key is that transparent pixels behave differently in a layer/image from how they do in a mask. They don’t exist to a mask while they do to a layer. So if you feed them to a mask & apply this mask to a layer they’ll crop them out, and if you feed them to a layer they’ll overwrite the layer below.
Tsubaki?
You may have noticed this post is tagged #tsubaki. What’s that all about? Tsubaki Bot is a Discord bot I’ve been working on for the past few years along with a few friends, and we’ve tackled a lot of really interesting & fun problems while building new tools for her. The next several posts that I write will probably all be Tsubaki-related!
Where can I find this code?
If you want to play with this code used, here is a link to the repo. Also, as customary, I will paste the full source at the time of me writing it (it’s possible it’ll change pretty considerably in the next few days as we’re actively working on this project). It’s under the MIT license (except for assets, see below).
main.py:
  1
  2
  3
  4
  5
  6
  7
  8
  9
 10
 11
 12
 13
 14
 15
 16
 17
 18
 19
 20
 21
 22
 23
 24
 25
 26
 27
 28
 29
 30
 31
 32
 33
 34
 35
 36
 37
 38
 39
 40
 41
 42
 43
 44
 45
 46
 47
 48
 49
 50
 51
 52
 53
 54
 55
 56
 57
 58
 59
 60
 61
 62
 63
 64
 65
 66
 67
 68
 69
 70
 71
 72
 73
 74
 75
 76
 77
 78
 79
 80
 81
 82
 83
 84
 85
 86
 87
 88
 89
 90
 91
 92
 93
 94
 95
 96
 97
 98
 99
100
101
102
103
104
105
106
107
108
|
import os
from math import cos, sin, pi
from typing import List, Tuple

from PIL import Image
from PIL import ImageDraw

from crop_orbs import get_orb

# dynamic config
USE_SPRITES = False
CUR_PATH = 'combined2/{}'
INPUT_FILE_PATTERN = 'originals3/{}.png'

# static config
OUTPUT_FILE_PATTERN = CUR_PATH + '/{}_{}_{}.png'
BORDER_FILE_PATTERN = 'borders/{}.png'
ELEMENTS = ['fire', 'water', 'wood', 'light', 'dark', 'nil']
ITEMS_PER_FOLDER = 50

# math
DIM = 76
R = DIM / 2
degrees = 15
A = degrees * pi / 180

ATTR1_PATH = [(0, 0), (R * cos(pi - A) + R, -R * sin(A) + R), (R, R), (R * cos(A) + R, -R * sin(A) + R), (2 * R, 0),
              (0, 0)]
ATTR2_PATH = [(2 * R, 0), (R * cos(A) + R, -R * sin(A) + R), (R, R), (R, R * 2), (R * 2, R * 2), (2 * R, 0)]
ATTR3_PATH = [(0, 0), (R * cos(pi - A) + R, -R * sin(A) + R), (R, R), (R, R * 2), (0, R * 2), (0, 0)]


def make_mask(path: List[Tuple[float, float]]) -> Image:
    """
    :param path:
    :return: a mask to use to make the thing transparent
    """
    poly = Image.new('RGBA', (DIM, DIM))
    pdraw = ImageDraw.Draw(poly)
    pdraw.polygon(path, fill=(255, 255, 255, 255), outline=(255, 255, 255, 255))
    return poly


def make_folder(f):
    path = CUR_PATH.format(f)
    if not os.path.exists(path):
        os.mkdir(path)


def open_image(elem):
    if not USE_SPRITES or elem == 'nil':
        return Image.open(INPUT_FILE_PATTERN.format(elem)).resize((DIM, DIM))
    return get_orb(elem).resize((DIM, DIM))


def main():
    folder = 0
    i = -1
    images = {elem: open_image(elem) for elem in ELEMENTS}
    for elem in ELEMENTS:
        print(i)
        make_folder(folder)

        attr1_image = images[elem]
        attr1_mask = make_mask(ATTR1_PATH)

        for elem2 in ELEMENTS:
            attr2_image = images[elem2]
            attr2_mask = make_mask(ATTR2_PATH)

            for elem3 in ELEMENTS:
                if elem3 == "nil":
                    continue

                i = i + 1
                if i == ITEMS_PER_FOLDER:
                    i = 0
                    folder = folder + 1
                    make_folder(folder)
                attr3_image = images[elem3]
                attr3_mask = make_mask(ATTR3_PATH)

                new = Image.new('RGBA', (DIM, DIM))
                new.paste(attr1_image, (0, 0), mask=attr1_mask)
                new.paste(attr2_image, (0, 0), mask=attr2_mask)
                new.paste(attr3_image, (0, 0), mask=attr3_mask)

                border_image = BORDER_FILE_PATTERN.format('DLR')
                if elem == elem2 == elem3:
                    # so as not to drop through to the next statement
                    pass
                elif elem == elem2:
                    border_image = BORDER_FILE_PATTERN.format('DL')
                elif elem == elem3:
                    border_image = BORDER_FILE_PATTERN.format('DR')
                elif elem2 == elem3:
                    border_image = BORDER_FILE_PATTERN.format('LR')

                border_file = Image.open(border_image).resize((DIM, DIM))
                border_file = border_file.convert('RGBA')
                new.paste(border_file, (0, 0), mask=border_file)

                new_file_name = OUTPUT_FILE_PATTERN.format(folder, elem, elem2, elem3)
                new.save(new_file_name)


if __name__ == '__main__':
    main()
|
crop_orbs.py:
 1
 2
 3
 4
 5
 6
 7
 8
 9
10
11
12
13
14
15
16
17
18
19
20
21
22
23
24
25
26
27
28
|
from PIL import Image

GAP = 3
ORB_DIM = 100
SPRITE_FILE = 'sprites/048.png'

orb_offsets = {
    'fire': [0, 0],
    'water': [1, 0],
    'wood': [2, 0],
    'light': [3, 0],
    'dark': [0, 1],
    'nil': [0, 3]
}


def get_orb(color):
    sprite = Image.open(SPRITE_FILE)
    target = sprite.crop(get_dim(color))
    return target


def get_dim(color):
    left = orb_offsets[color][0] * ORB_DIM + orb_offsets[color][0] * GAP
    upper = orb_offsets[color][1] * ORB_DIM + orb_offsets[color][1] * GAP
    right = left + ORB_DIM
    lower = upper + ORB_DIM
    return left, upper, right, lower
|
Disclaimer about assets used
Assets in this article belong to GungHo Online Entertainment, Inc. (the borders were fan-created) and are part of the mobile game Puzzle and Dragons. They are used here for illustrative purposes only. This is a 3rd party site and has no affiliation with GungHo.