As promised, I’m going to talk about how to configure Sphinx for Read the Docs. Read the Docs is a super awesome documentation hosting platform that’s free for OSS projects, and Sphinx is a super awesome tool that automatically builds module documentation from your docstrings in Python, but…I did not have the most pleasant of experiences configuring them.
So here’s a tutorial (and also rant) about how to configure Sphinx & Read the Docs. I would suggest that, before you try this build from scratch, you find an existing project with Sphinx docs (you can use mwcleric if you have nothing else), fork it, build its docs, make at least one change, and at least pretend to open a pull request (bonus points if you do have something meaningful to add!). This way, you will ensure sphinx is installed and that you are somewhat familiar with folder structure. After that, you can try building from scratch in your own project.
One caveat: While I was googling all of my setup problems, I found a TON of outdated information. I’m guessing a lot of these tools get updated relatively frequently, and you may find that what I’m writing here is out of date by the time you’re reading it. If you do notice that, please let me know! But I’m unlikely to proactively update this article otherwise (unless I follow it myself and get stuck hahahahaha).
Good luck, future me!
What is Sphinx?
Sphinx is a tool that automatically generates HTML (or PDF or txt or whatever) documentation from your Python docstrings and, optionally, markdown or rst files. It depends on some specific formats in docstrings like :param param_name: info about the param here which PyCharm conveniently will fill out for you if you press enter after a """".
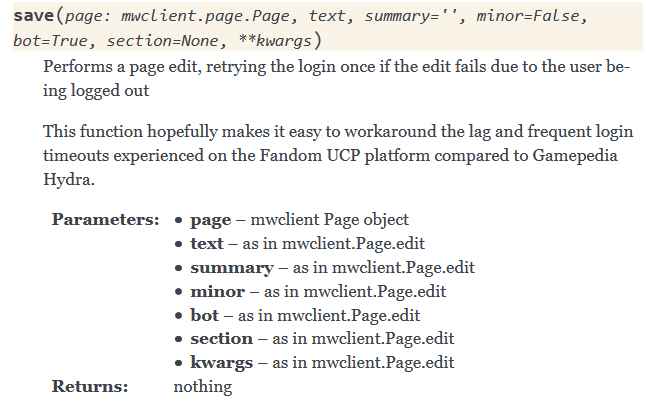
Here’s an example docstring formatted for Sphinx from mwcleric:
|
|
When you build your project, you’ll get something like this (depending on your theme - I’m using the default theme, Alabaster):
You’ll also get an A-Z index and a module index as well as a search page.
Helpful links
Before we begin, here’s some links you might find useful at various points throughout your journey, along with some commentary.
- Read the Docs tutorial - Helpful! You should read this tutorial in addition to mine.
- Read the Docs FAQ - these address some more advanced issues. If you follow the tutorials and get stuck, try reading the FAQ and see if any of the questions applies to you; however, it’s likely that nothing here will be needed if your project is “simple enough.”
- Sphinx documentation quickstart - honestly not that helpful to me, but you should always have the official docs of your tools open when you’re using something.
- Read the docs Sphinx quickstart - more helpful than the official Sphinx quickstart.
- Sphinx-PyCharm integration - this “integration” saves you…one CLI command. This is silly. This is completely ridiculous. I am linking it here so that you don’t stumble across it on your own and think it might be useful.
- Read the Docs Configuration File V2 - You may want this if you need to, for example, specify a non-default Python version for your build. Note - if you are reading this article say 3 years later than its publication, who am I to guarantee V2 is still current? Check for deprecation warnings.
- I’ve heard great things about the Write the Docs Slack. I’ve never joined it as of publication of this article, but they have a channel called
#sphinxso you can likely get help there.
Local setup
Prerequisites
I’m going to assume you have the following, and not discuss their installation:
- A Github or Gitlab account, and working knowledge of how to use it
- Git installed locally, and a working knowledge of how to use it - if you want to make a branch for all of your docs stuff for the first time, I would recommend that, if you aren’t comfortable with branches & just want to push to master, fine, but you should learn how to branch (but I’m not going to go over anything Git-related in this article)
- Python installed (obviously)
- Your Python project is set up and has
__init__.pyand all that stuff - basically it’s a library (I’m actually not sure the extent to which this is required, so you might be ok with other project structures, but you’re on your own in that case, sorry) - You’re using a Bash command prompt - even if you’re in Windows, please be using a Bash CLI! Git Bash works fine. I’m not sure how well WSL will work. WSL 2 probably not. WSL 1 might but I’d stick with Git Bash or another natively-Windows shell to be on the safe side. A lot of troubleshooting articles I ran into were like “omg the problem is you’re using Windows CMD”
Initial setup
I’m going to use mwcleric as the example directory. So my path is .../Wikis/Python/mwcleric and you can see my full project structure.
pip install sphinxif you haven’t already.- Navigate to your project root; for me this is
.../Wikis/Python/mwcleric. mkdir docscd docssphinx-quickstart- congratulations, you have now exhausted the extent of PyCharm’s amazing Sphinx integration!- Yes, separate directories
- Project name should be your project name (e.g. mine is
mwcleric) - Author name is your name
- Project release you can leave blank or put version number
- Language you can leave blank if it’s
en
cd ..(you should now be back in your project root)sphinx-apidoc mwcleric -o docs/source- you’ll replacemwclericwith the name of your library. This is using the contents of.../Wikis/Python/mwcleric/mwcleric(note the extra nested subfolder) to populate.../Wikis/Python/mwcleric/docs/sourcewith the autodoc contents. Any time you create a new file (aka “module”), you’ll want to rerun this.- Edit the file
index.rstif you want. “Welcome to my docs! Here’s how to install!” etc. - Skip to the next section and make the changes to
conf.py. There’s too many to put inline here. Come back when you’re done. - Did you make all the changes to
conf.pyfrom the next section? No? Go do that!!!! Ok now you did? Good, now you can continue. sphinx-build -b html docs/source/ docs/build/html- if anything fails you can add a-vflag (verbose) to get error logs.- Congratulations, you should now have docs! You can preview them by looking in your file explorer in the
/docs/buildfolder and opening an html file, it’ll open in your browser. Make sure the auto doc actually created docs from your docstrings and such. If not, check out the troubleshooting section. - Add
/docs/buildto your.gitignore, also you probably want to exclude the directory from search & indexing in PyCharm (it should prompt you about this once you add it to.gitignore). (In fact you may choose to exclude all of/docsfrom search in PyCharm.) - After this point, you can
cd docs& from theremake htmlto rebuild. Or, if you’re paranoid and want to totally delete the files and rebuild,make clean && make html.
Troubleshooting
- When I was running this, I had my libraries installed locally, and Sphinx insisted on building from the installed versions, not the local versions. So I had to uninstall the libraries for them to build the actual latest versions. If you think your changes aren’t taking hold, try straight-up blanking a file and rebuilding. Nothing happened? Hmm, it’s probably not recognizing local changes at all.
- As mentioned earlier, make sure you’re running in a bash shell, and not Windows command prompt.
- If your project is configured to run in a venv, but you’re running sphinx outside of that venv, sphinx won’t be able to build. Make sure you’re in the right environment!
- Formatting - You need a blank line between any lines of text and the first
@paramline in your docstrings! - Formatting - Same deal for bulleted lists! Blank line before the first
*or-! - As I’ve said, it’s totally possible this article is out of date. Sorry!!!! If you see an update I should make, please let me know!
- Read the Docs FAQ
Changes to conf.py
There’s two mandatory changes and one optional change to make here before you build your docs.
Tell Sphinx how to find your files
First, uncomment the following lines and change the third one to the correct location of your project root:
|
|
Here’s the new result:
|
|
The original was assuming you had a totally flat project structure; you don’t.
Tell Sphinx to use autodoc
Next, add the autodoc extension to the list of extensions.
Original:
|
|
New:
|
|
Optional - improve class docs
By default, Sphinx ignores docstrings for __init__.py and shows only top-level docstrings for the class itself. I think that sucks; we want to show both, especially for classes that have lots of optional configurations in the __init__.py method (such as the mwcleric class TemplateModifier).
Add this anywhere (I put it at the very bottom of the file):
|
|
Ok that’s it, now you can proceed with the setup.
Publishing to Read the Docs
This part is the most straightforward. You can probably follow their tutorial.
Local setup
- Create or update your
requirements.txt. - Make a Read the Docs configuration file in your project root if you need to.
Remote setup
- Sign up. Please connect a GitHub or GitLab account, your life will be so much easier - it’ll automatically do all of the webhook integrations for you every time you push a commit.
- Import a project.
- Their tutorial says to leave the default branch of the project as
main. If somehow you missed the news, Git branches can be eithermasterormain. Put whichever one you use here. It’s probably the default.
- Their tutorial says to leave the default branch of the project as
That’s probably everything you need at this point, but you can read the rest of their tutorial if you want. If I had, I wouldn’t have wasted 30 minutes or more thinking that the view raw button was useless (see below), because they do explain it here. But also, most of the information on this page is pretty unhelpful, and that’s still a terrible UX copy decision to call it that.
If your build fails at this point, the most likely cause is that your requirements.txt or config file is incomplete or incorrect. Look at the logs from the view raw link in the builds tab (see below).
I’ll now explain the Read the Docs UI.
Navigating Read the Docs
Remember, screenshots of a website UI are the most likely thing to become out of date. Good luck!
More helpful links
- Read the Docs import project from Github - you can get here from the tutorial page, but here’s also a direct link.
- Dashboard - After you’ve imported projects, they’ll all show up here
Finding things in your project page
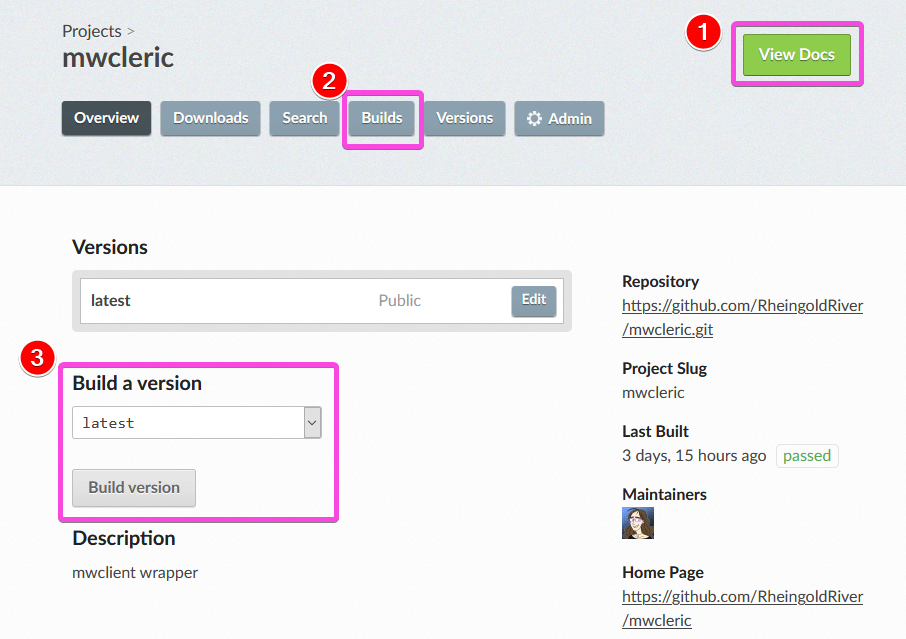
Once you’re on your project page, you can find and do everything useful.
- View your current docs!
- See a list of all of the builds. This link will also take you to your build logs, so it’s the link you’ll probably use the most while you’re here.
- Hopefully you automatically connected your Github & Read the Docs accounts, so your docs automatically build every time you push a commit. (If not, you can read about VCS integrations.) But you can also build manually from this page by selecting a version to build from the dropdown and then building that version.
Builds tab and logs
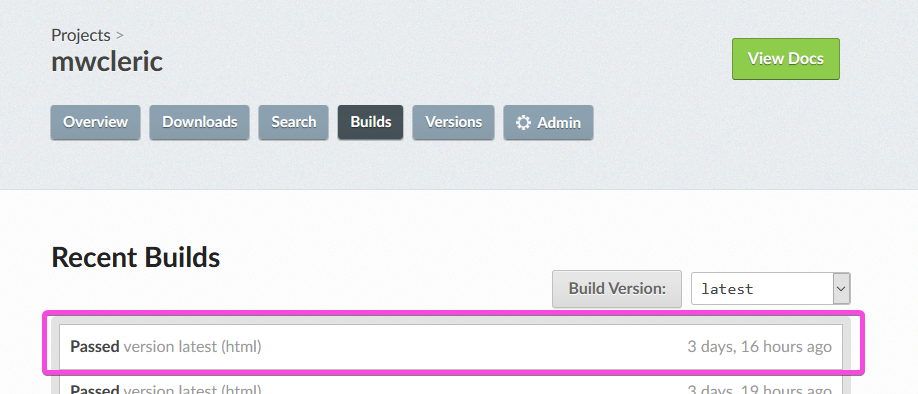
From the builds tab, you will select a build to view the logs for.
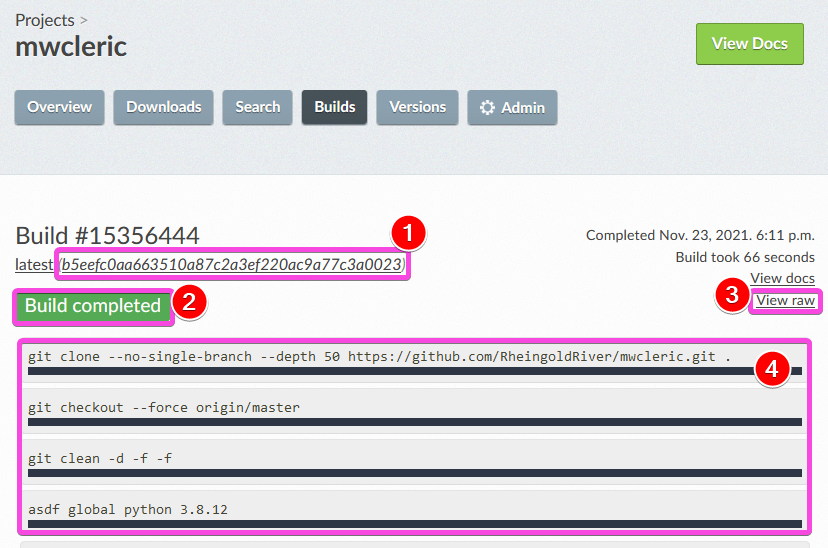
- When you’re looking at a specific build log, it will tell you which commit the log is for, so you can have zero doubt about what you’re looking at.
- You can also watch the status while the build is occurring; once it’s finished it will turn green (instead of grey) and say “Build completed.”
- The link to the complete logs says “View raw” and is a button below a link that says “View docs.” This is one of the worst UI design decisions I’ve ever seen, and it was responsible for wasting at least 30 minutes of my time; I kept seeing advice to view logs to look for error tracebacks. Well, where were the logs? This was obviously a link to view the raw
rstversions of my docs, so why would I click it? It never even occurred to me this might be a link to the full logs; I literally just clicked it out of frustrated boredom eventually, and then imagine my surprise when it was…the logs!! Wow! So, yeah. Logs. (And hey, if anyone from Read the Docs is reading this, maybe you could change the link to say “View full build logs” or “View build logs” or something?) - Abbreviated logs. They might actually help you troubleshoot some things, if the build flat-out fails for (for example) file-path reasons, as opposed to (for example) missing module requirement or Python version reasons.
Conclusion
Whew! No individual part of this process is that complicated, but it all adds up to quite a lot. If you’re intimidated by it, that’s ok! It took me about nine months to go from “hey I want docs on Read the Docs for this library” to actually pushing them (though admittedly I was somewhat delayed by a couple unexpected huge projects along the way). But the result is pretty neat - automated documentation that self-updates every time you push a commit to your repo! Super awesome!
I definitely encourage you to give it a try for at least one project, and even if you give up partway through, you accomplished the goal of “partway creating Sphinx documentation for a project” which is totally an accomplishment. I always say configuring tooling is the hardest part of programming, and I don’t think I’ll ever stop saying this, because it’s true. So good luck, try to have fun, and go write (automated) docs!