So you’ve heard that a lot of cool stuff is possible “if you just use the API,” but that sounds kinda scary. The API? Isn’t that a thing developers use? Don’t you have to write code for that? Isn’t it complicated? I don’t know JavaScript! Fortunately, you can do a lot with the API without writing a single line of code - by using the API Sandbox. And even if you do end up writing some code, starting out working with the sandbox can make your transition into doing some basic development tasks a lot friendlier.
(Note: All code in this post was originally written by me for Leaguepedia and is licensed under CC BY-SA 3.0.)
The API sandbox is built into MediaWiki, and no special configuration is needed to be done to make it available. Just go to the page Special:ApiSandbox (given capitalization is correct, even though it doesn’t match “API”), and then you can start interacting with the GUI! We’ll go through a quick tour of some of the things you can do here - some will be useful mostly from an educational point of view, while others may be tools you start to make use of regularly!
The first thing to look for on the page is the “action” input box (apologies for the light-mode screenshots):
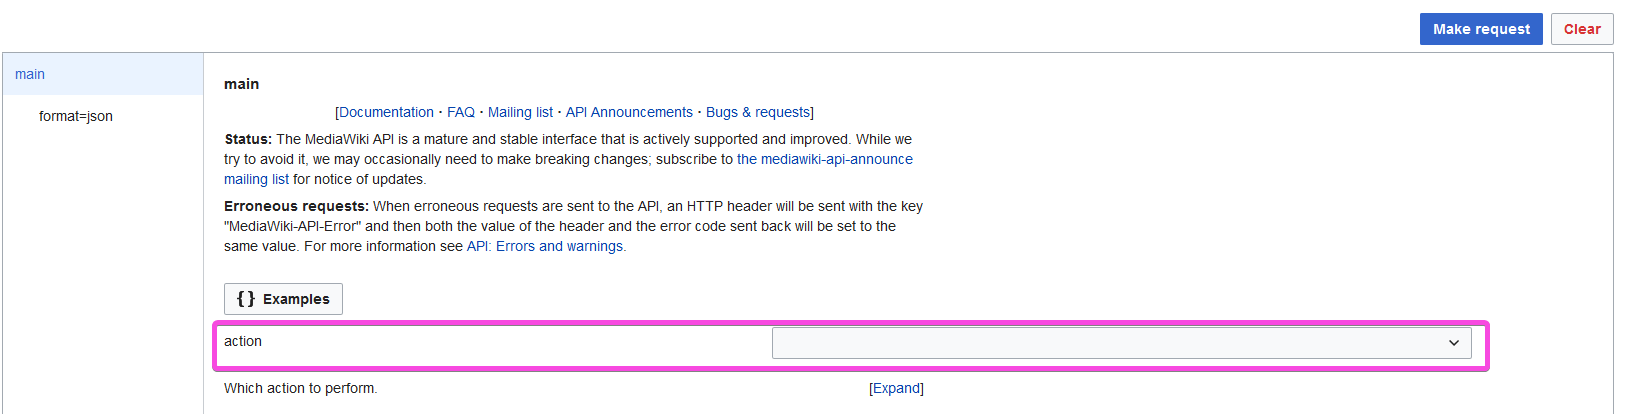
This is a dropdown from which you select the type of thing you want to do. Some types of actions you might use:
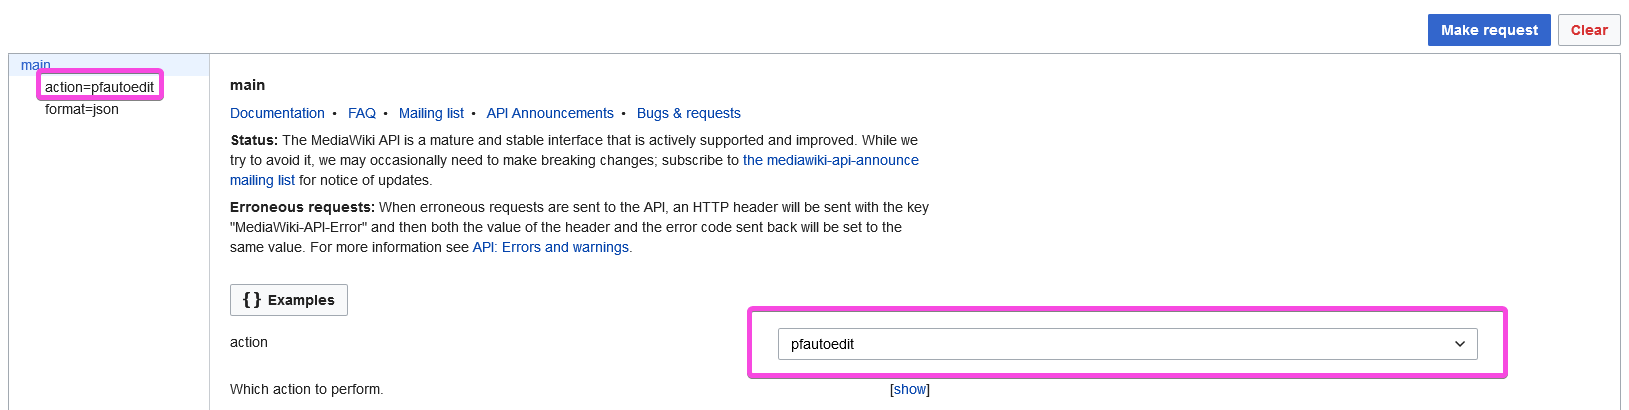
query- get information about a page, revision, category, report (like DoubleRedirects), etc. This is probably the most common action you will do.edit- edit a page. You can replace its entire text, append something, prepend something, or even just blank/null edit to refresh cache.delete- delete a page or set of pages (useful if there was a spam bot attack that created lots of pages).move- move a page.pfautoedit- this is provided by the PageForms extension, and we’ll go over it a bit later - this is probably the easiest action to do something useful with.parse- if you want to lazily load part of a wiki page, you will likely use this action to create HTML that you can insert into the DOM (if you don’t know what this means, don’t worry).
Let’s look at the pfautoedit action, because this is one of the simplest ones to use. If you don’t use Page Forms, you can skip the next paragraph, which explains why we might want to use this, and jump to the paragraph after, which explains how to do it.
Why use pfautoedit? When you make a change to a form such as adding a checkbox or changing the order of two parameters, the wikitext that gets saved to the page upon submission changes. If you add a checkbox, a value of Yes or No will be added by the extension. If you change the order of parameters, the extension will change the order of previously-given parameters. This can cause a lot of irrelevant “spam” to take up much of future diffs on pages that already contained saved versions of the old wikitext. Sometimes this isn’t a big deal, but if you make a lot of changes - or if you have to pay very close attention to new revisions - it can be pretty annoying to deal with. Fortunately, the extension comes in with a built-in way to deal with this! The pfautoedit action applies a “form edit” to every page you send it to. (Note that there are other ways, outlined at the extension’s documentation, of performing this action automatically.)
How to use pfautoedit? If you skipped the last paragraph, welcome back! Let’s walk through how to use this action - it’s the same basic process for any action you might take.
Notice how on the left bar, there’s a new entry, which says action=pfautoedit. Let’s click that. You will get to a page that looks something like this:
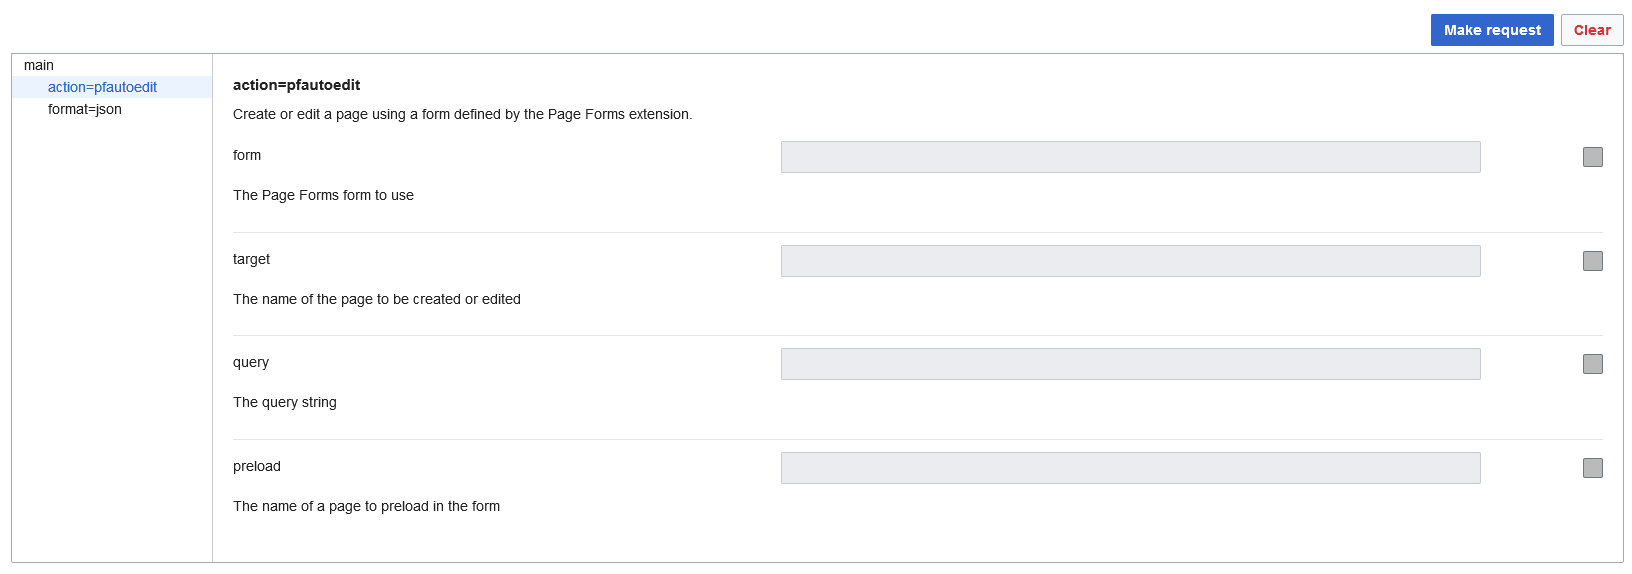
Now is the part where you hope there’s good documentation on whatever you want to do, though sometimes you can just guess. You should bookmark the API manual on mediawiki.org for documentation. If you’re using an extension’s API, such as Page Forms’ pfautoedit, you can check the extension’s documentation or even reach out to the developer(s). That said, sometimes you will find the fields familiar even on a new action type you’re working with - for example, many actions have a field called “Title” that wants you to give it the title of a page.
In this case, pfautoedit requires two fields be filled in - the form, and a target. The target is just a page title, and the form is the name of the form you want it to apply, without the Form: prefix. So, if we want to apply the form Infobox Player to the page Faker, we can send it the following input:
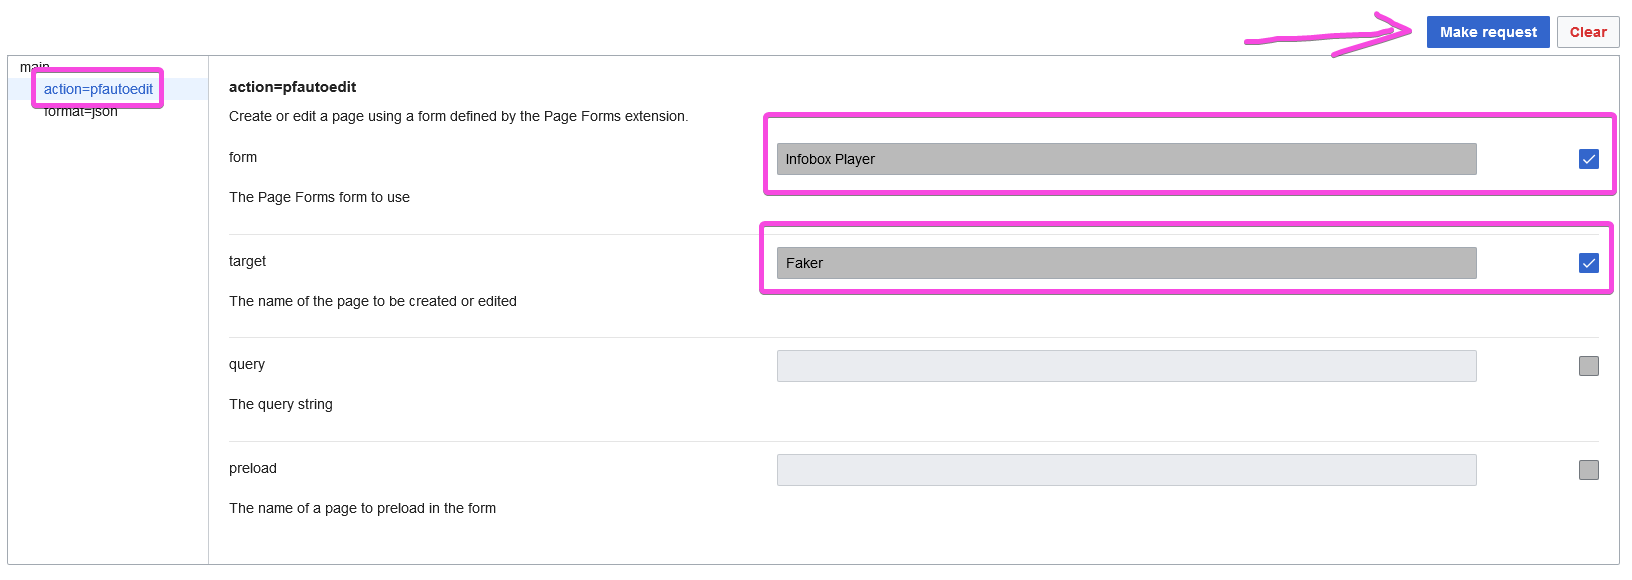
In this screenshot, every field that we’ve made a change to is highlighted in a pink box, and the arrow is pointing to a button that says “Make Request.” So let’s press it!
WARNING: Every action you make in API:Sandbox will actually be run on your actual wiki!! It is not a safe sandbox playground for testing!!! Be aware of the consequences!!!
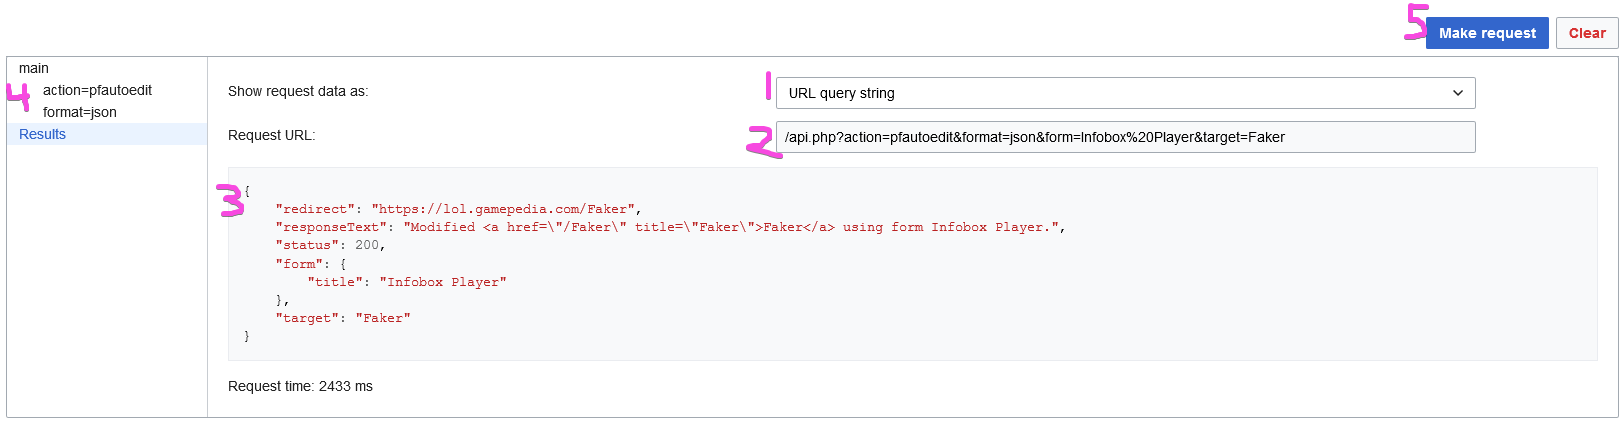
I’ve numbered several items in this result. Let’s look at each one:
- Where it says “URL query string,” this is its summary of what you just entered. You can click to have it show you the JSON format instead.
- The URL form is useful if, for example, you wanted to be able to bookmark a URL to perform this action on demand - typically I would expect to do this for a query, though, rather than a “doing-something” action.
- The JSON form is useful if you want to write code with all of the parameters written out as a nice, neat JSON (basically set of key-value pairs of the arguments you put in it).
- The box below it shows whichever thing you selected in part 1.
- The main results section shows either a success or failure, if you did something, or the results of the query, if you queried something. In this case it’s a success message. Yay!
- If we wanted to go back and edit parameters in the
pfautoeditaction page, we can click here and then run it again. - If we want to run the exact same request a second time, we could click “Make request” again. Clicking “clear” will take us back to the very start, before we even selected an action.
Now that we’ve gone over a simple case of how to type arguments in and get a result, let’s look at a sample query action that you might want to take. This is also an example you should be able to follow along with, even if you don’t have Page Forms installed.
Going back to the first screen, click query in the action dropdown, and then click ation=query in the sidebar. Now, on the action=query settings page, there’s two important fields to understand:
prop- these are properties of a single page that you might want to request. If you want to retrieve the text of a page, you need to request the most recent revision, and grab the text of that. In thequerymodule, text of a page belongs to a revision, not to a page. You can also get things like a page’scategories, or whatlinkshere. You are allowed to select more than one thing to query at the same time - so for example, you could ask for bothlinkshereandtranscludedinat the same time, to fetch the pages that either link to or transclude a particular page! (“Transclude” is what you do when you use a template, e.g.{{Template:Kittens}}will “transclude” the pageTemplate:Kittens.)list- these are lists of pages, revisions, logs, files, etc, that you can retrieve. Different types of lists will need different parameters given to them. For example,categorymemberswants you to tell it a category to give the members of.recentchangeswants you to tell it an interval to fetch revisions from. Andquerypagewants you to give it the name of a special page (for example,DoubleRedirects) that it’ll retrieve for you.
Let’s select linkshere and transcludedin
At this point, you probably know everything you need to know in order to read documentation and figure out how to use the API! Just select one from the dropdown and then the other. By the way, most fields should give you some documentation if you click the [show] button below the field.
Take a moment to look at the left column - there’s actually yet another set of pages that we can click and enter information on! But first, we have to give more information to our query.
Scroll down the page, and find titles. Pick a page on your wiki that you want to see the information about; for example, on Leaguepedia I could pick “Faker.” Take note of one thing - in the pfautoedit example we looked at, we just typed values into the fields, no big deal. But for some fields, such as titles here, the wiki wants to do some validation of your input. Depending on your version of MediaWiki, you might have to press enter after typing your input and tabbing or clicking outside the box won’t be enough. It should draw a small oval with an X (to remove it) around your page name.
If you like, you can put two or more page names in the box here. Each one should get its own little oval drawn around it (so again, in some versions of MediaWiki, you might have to press enter after each title). I’ll add “T1” as well, which is the name of the team that the player “Faker” plays for.
Now let’s go back to the left column with the new links: prop=transcludedin and prop=linkshere. This means there’s some data that’s unique to each of these properties that we should specify (or deliberately leave default). There’s nothing particularly special about either of these options pages, so just take a look at them, notice how they work, and leave it at that - remember, you can always redo the query later.
Because we’re doing a query action, there’s not much to worry about in terms of accidentally breaking something, so go ahead and hit Make request. Here’s the report on my wiki (I limited both transcludedin and linkshere to 1 for the purposes of illustration):
Input parameters I gave:
|
|
And output:
|
|
So, the first part, which says continue, is there to give information back to the API if we wanted to get more results after the first 1 (or whatever limit you set). If you retrieved your full results set, it wouldn’t be there. You might have to scroll to see it, but there’s a button below the response that says “Continue” as well as one that says “Clear.” As the info icon to the right of these buttons notes, “Continue will continue the last request; Clear will clear continuation-related parameters.”
If we name the entire response response, then the results with information are contained in response['query']['pages']. The reason it says query is that we did a query action. If we had done an expandtemplates action, it would be response['expandtemplates']. Because we did two pages, there’s two pages here - note that the key of each part is the page ID and not the page title. This can be kind of annoying to deal with, and it means that when you’re writing code you often want to do a for loop of 1 thing - but we aren’t writing code, so ignore this (for now at least).
So the first page, 158918, says that its title is Faker, and it’s transcluded in Faker (itself), and the page Archive:Leaguepedia Articles/13 Reasons to Remember 2013 in League of Legends links to it.
The second page, 294322, which is T1, has no results (because we limited our query to 1 thing total). But it could also have transcludedin and linkshere sections.
Take some time to play with different queries. See if you can find out something interesting about some of your pages!
So, why did I pick transcludedin and linkshere? Well, actually, I have some sample code to show you - even though I said no coding! This is code I use in my personal JavaScript (go to Special:MyPage/common.js on your wiki if you want to use it) to show the total number of results at the top of a Special:WhatLinksHere report for a page. Here it is:
|
|
(Notice that one-item for loop I mentioned earlier?)
So even if you don’t understand any of the code part, or why it says .then after the return or any of that, just look at this one bit:
|
|
You can see the action is a query, the properties are linkshere and transcludedin, the titles variable gets some title I figured out earlier, I want the max results for both linkshere (specified by lhlimit) and transcludedin (specified by tilimit), and the lhnamespace and tinamespace are both specified based on…something (search “javascript ternary” if you want to understand the syntax). That’s really similar to the parameters we specified above in the format=json display! That’s halfway to understanding how to write code to have fun little utilities like this. Yay!