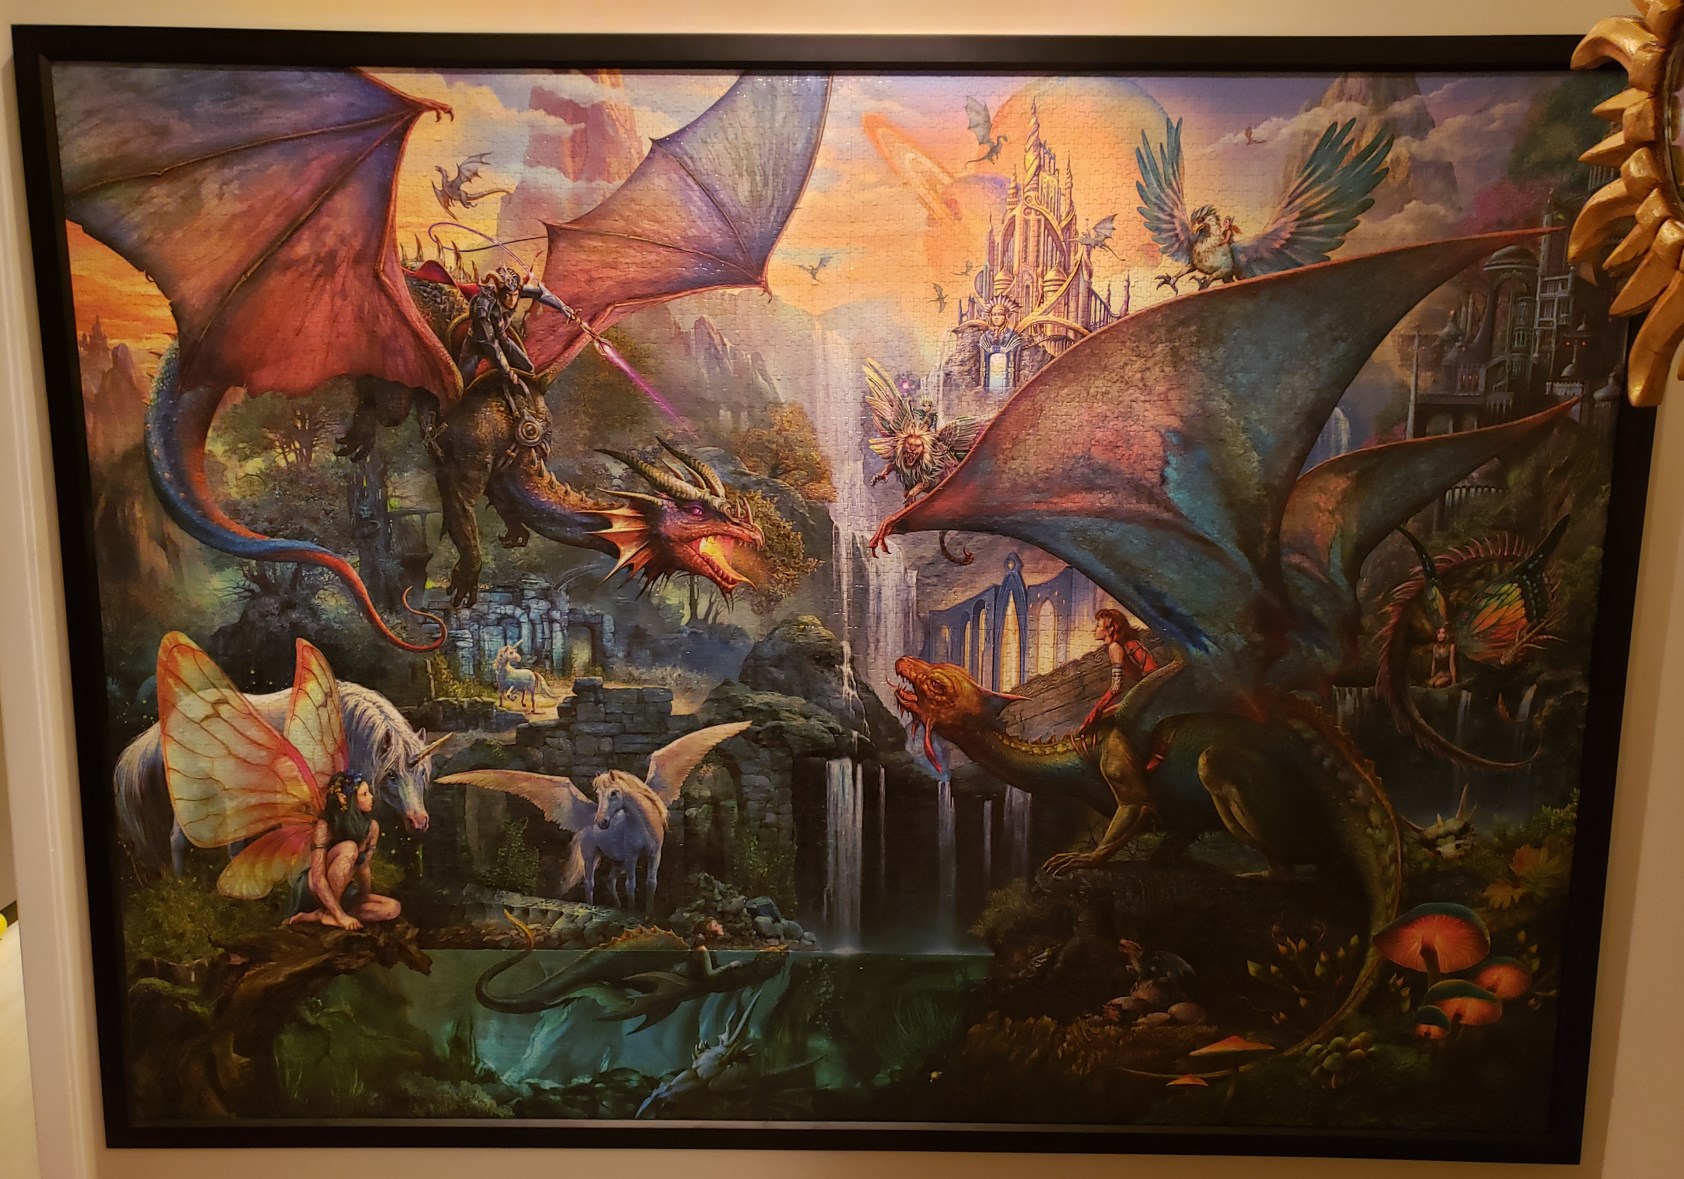
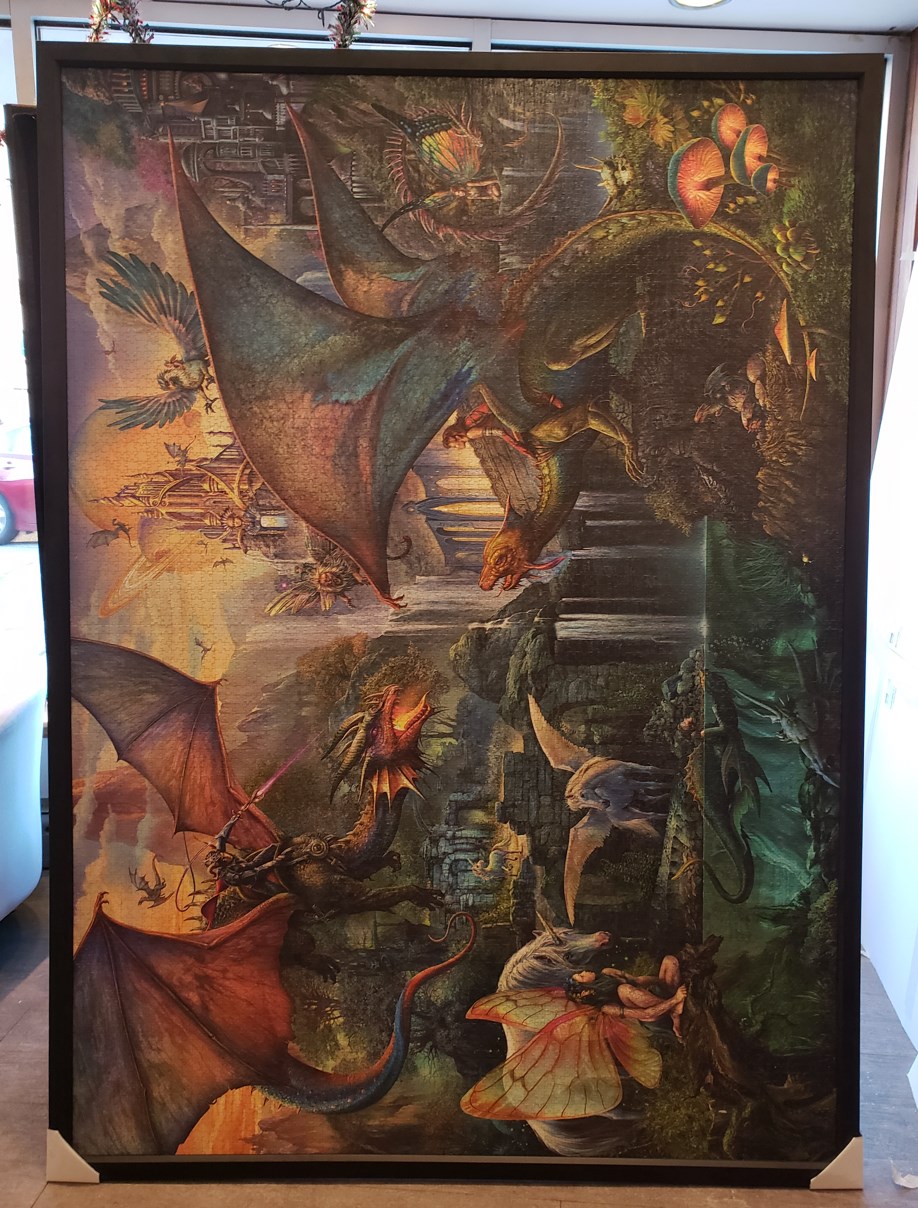
In November 2023 I started Ravensburger’s 9000-piece Dragon Forest puzzle, and I finished it in early January 2024. To my best estimate, it took me about 240 hours to complete.1
From the beginning, I was planning to glue & frame this puzzle when (if!) I completed it. I know some people will think it’s anathema to apply glue to a jigsaw puzzle, but I always intended this to be wall art.2 What I was not expecting was that the process of gluing & framing this puzzle would be WAY more difficult than doing the puzzle was.
I did not frame this puzzle myself, rather I brought it to a specialty frame store to have them frame it for me. But preparing your puzzle to be framed is already a gigantic undertaking, so hopefully this will help you.
Probably most people just want to see the completed puzzle and don’t care about the rest of the article, so here’s a picture:
This article was posted to HackerNews a few days after I published it, and there is some good discussion on the comments there, particularly if working with large sheets of heavy material like plywood is within your comfort zone (not an option for me).
Planning
Once I finished my puzzle, I turned to the internet to learn how to frame it. Sadly, while I found guides about how to seal a puzzle and how to store a 24,000 piece puzzle, I did not find much about sealing & hanging a 9000-piece puzzle. My friend Chloe found a post about mounting an 8000-piece puzzle to the ceiling, but while it’s definitely made me want to complete a gigantic puzzle of the Sistine Chapel and mount it to my own ceiling,3 it doesn’t describe sealing4 the puzzle, and I’m not looking to mount a gigantic wooden slab from my wall.
So, I asked the internet. I ended up with two possibilities:
- DIY method - seal the puzzle and then glue it to some substrate (probably gatorboard?). Instead of framing it, add an “interior” frame about 1 foot inset from the edges. Mount to the wall using a French cleat.
- Frame store method - seal the puzzle and then bring it to a frame store and have them frame it for me.
I explored both options and ultimately decided on option 2, but I think option 1 could work if you’re more DIY than I am. Word of warning: No contractor will help you with this project. You’ll say the words “jigsaw puzzle” and they’ll say “nope, absolutely not, I’m not taking on that liability.”
Gluing the puzzle to itself
Regardless of which method you choose, the first thing you’ll need to do is attach all of the pieces to each other so that you are dealing with a single sheet of “completed puzzle” instead of 9000 individual pieces. My strategy for this was twofold:
- Mod podge the front of the puzzle, both for structural reasons and to give it a protective coat.
- Use adhesive sheets on the back of the puzzle, to assist with bearing the weight of the pieces and also provide adhesion on the opposite side of the puzzle.
- But I kind of regret doing this, and I ended up asking the frame store to puncture my adhesive sheets to make sure the framing substrate was adhered directly to the puzzle; otherwise the puzzle <–> adhesive sheets would be too much of a weak point.
I experimented a lot with different options here, doing five 500-piece puzzles, one 1000-piece puzzle, and one 3000-piece puzzle just to practice applying mod podge and try different application techniques. I don’t think you need to prepare quite this much (especially since I am going to tell you the results of my experimentation), but you should definitely practice on at least one 500-piece puzzle of the same brand as your 9000-piece puzzle before moving onto the bigger one. You’ll want to get a feel for how much mod podge to squeeze out in a certain area and get some practice hiding strokes at the very least.
Here are some things I tried and how they went:
- Using a mod podge roller and not following up with a squeegee left an interesting texture on the puzzle, but it did a terrible job of acting as an adhesive. If you want the paint texture, do the first layer with a squeegee and then the second layer with brayer only.
- After several attempts where I used a brayer and then followed up with a squeegee on each coat, I tried omitting the brayer altogether and using a bigger squeegee. This worked much better and is what I recommend doing: Pour some mod podge out onto the puzzle and then spread it with a 6" squeegee, and don’t bother with a brayer at all.
- Outdoor mod podge works very well as a first layer. It’s pretty thick, which I felt was easier to work with than the thinner matte sealer. I was recommended to use outdoor for UV protection, but I don’t think outdoor actually provides any UV protection; still, I liked the texture and I don’t mind some water resistance.
- To get as flat a matte coating as possible, I also tried a spray mod podge. This will both give your puzzle a slightly matte finish and result in a not-too-sticky finish.
- Spray mod podge creates really bad fumes!! If spraying smaller puzzles for practice, try to do it outside or in your garage if you have one. For the final puzzle, you may not have the option to bring it outside because it’s too big. In this case, either spray it right before going out of town (this is what I did) or do it in a room you can close off for a few days with an open window (check the weather forecast). If you can’t do any of these things, find a different solution that doesn’t require using a spray can.
- It tells you to do like 5 coats, but since you already did 2 coats of outdoor mod podge, you don’t have to do this many coats of the matte spray, 2 should be enough.
- As the mod podge seeps between the cracks of your puzzle (which is a good thing, this is how it acts as glue and we want this to happen), it will necessarily adhere your puzzle slightly to whatever surface it’s sitting on. This MUST be parchment paper or something equally nonstick. DO NOT use wax paper. Wax paper will stick to your puzzle and cause damage when you try to pull it up. Getting parchment paper underneath your puzzle is very difficult at 9000-piece sizes and I will discuss this in a later section.
- I used these puzzle glue sheets
- I do not recommend using these
And here are some thoughts on the process of gluing the actual puzzle:
- Unless you are a lot taller than I am and have much longer arms, you will probably be unable to reach the middle of your puzzle, and especially not well enough to see if there are strokes visible from the sides of the squeegee that you still need to smooth out. But, it is totally fine to sit on your puzzle while doing the middle! (In fact, I sat on my puzzle a bit while solving it…)
- You will therefore want to start each coat in the middle of the puzzle, while sitting on the edge, and then work your way out. It is totally fine to mod podge in sections like this, you won’t see where the section started and stopped when it’s dry, just be careful about the trails left from the sides of the squeegee.
- I don’t recommend sitting directly on the puzzle; I sat on a piece of foam board on the puzzle. This does a few things: you won’t get lint or threads from your clothing stuck to the puzzle; the foam board will disperse your weight a little bit; and because your puzzle almost certainly has a few pieces that are a bit damaged, this will stop you from damaging the already-damaged pieces even more as you move.
- For your second coat, I recommend putting some additional parchment paper in between the puzzle and the foam board you’re sitting on, to prevent sticking.
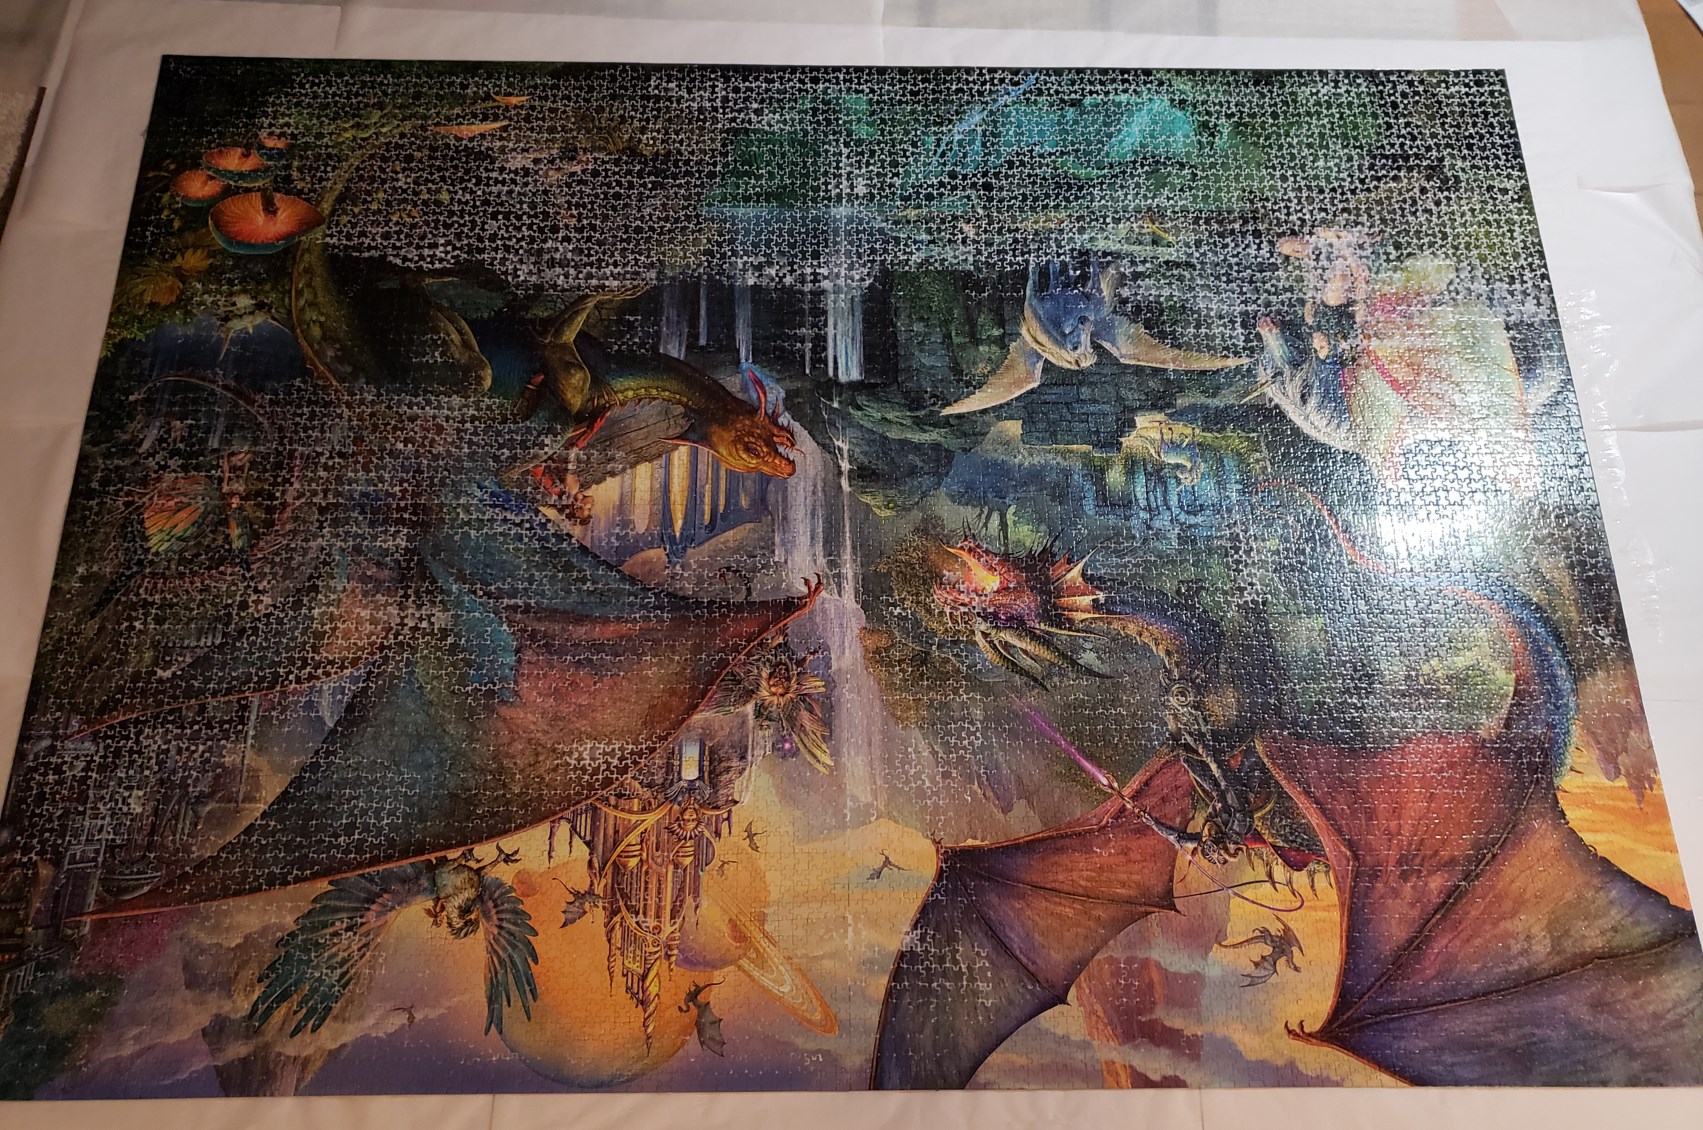
Getting parchment paper underneath your puzzle
Honestly, you will have the easiest time if you complete your puzzle on top of parchment paper in the first place. I did my puzzle on a 3x3 grid of foam board sheets, and this worked pretty well except that I wish I’d then covered the foam board with parchment paper, wrapped the parchment paper around the edge to secure it, and solved the puzzle on top of that.
You will likely NOT be able to slide parchment paper all the way underneath your puzzle. You’ll risk damaging your pieces.5 You will probably need to make a second 3x3 grid of pieces of foam board taped together. This is fine, because you need 2 such grids to transport your puzzle later on anyway. Cover the new grid in parchment paper, probably 4-5 long sheets parallel to the longer axis and slightly overlapping. Temporarily fold these sheets over the edges, but when you start applying mod podge you’ll want to make sure your puzzle is lying super flat, and you’ll want to untuck the edges for that.
One option is to slightly disassemble your puzzle, probably into 6 sections (in half parallel to the long axis and in thirds parallel to the short axis) and then pick them up individually and place them on the new grid (on top of the parchment paper). Then reassemble them. If you are working by yourself, this is probably the only method that will work.
If you have help, then what I recommend is to make a stack as follows: New board at the bottom; then the parchment paper; then the original board that the puzzle is sitting on, and the puzzle. Do NOT cut the new grid to size, but if you didn’t already, use a box cutter to cut the puzzle’s original grid so that it’s only a couple centimeters bigger than the puzzle itself. So you have oversized grid + oversized amount of parchment paper below the cut-to-size grid & the puzzle.
Then slowly slide the original grid out from underneath the puzzle so that the puzzle eases down on top of the new grid + parchment paper. It’s important that the new grid is oversized because you’ll need to do this with diagonal motion; the puzzle is not strong along either of its axes, but if you tug back and forth along the diagonal, you should be able to secure the puzzle well enough that it doesn’t come apart or get damaged. You’ll need two people for this operation.
When the puzzle is transferred to the new grid, save the old grid, because eventually you’ll need to transport your puzzle to the place you’re having it framed at, and you’ll want it sandwiched between 2 layers of foam board at that time.
Transporting the puzzle
If you live in a house with a garage and can carry your puzzle directly to a flatbed truck, this all gets a lot easier. But if (for example) you live in an apartment or condo with an elevator that’s too small for the puzzle to go inside and have to carry it down a stairwell, you need to be a lot more careful.
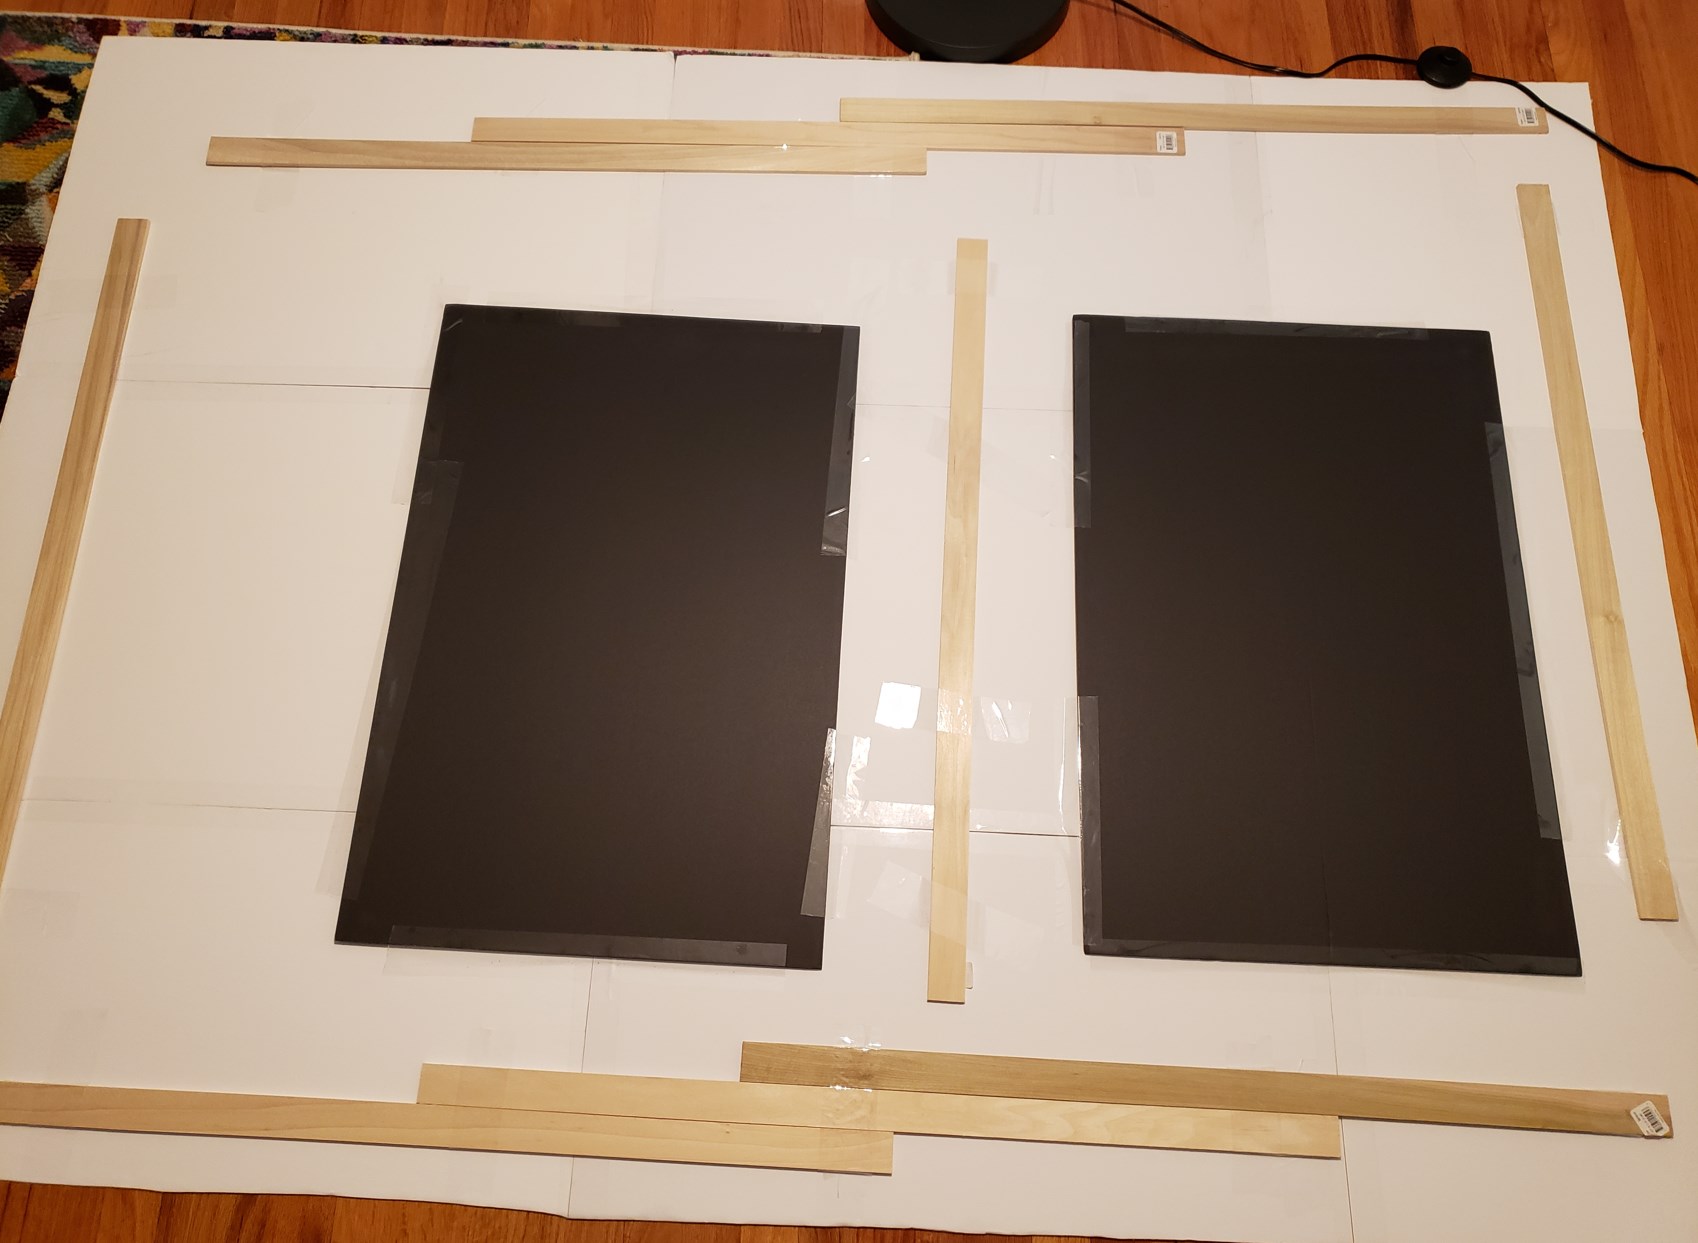
As discussed above, you’ll want to sandwich the puzzle between two grids of foam board. I also reinforced one of the grids with wood panels. Then I used nearly an entire roll of cling wrap to bundle the full stack together, wrapping around both axes. Cut the cling wrap when you bring it to your final destination.
Once the puzzle is framed you can be a lot less careful bringing it back home, because it’s now reinforced with a frame.
Hanging the puzzle
I used two Hillman WallDriller drywall picture hooks, part number 122401. I don’t have details about the wire because the frame store gave me that, but just make sure it’ll hold at least 20 pounds (maybe more depending on what frame you chose) and you should be fine.
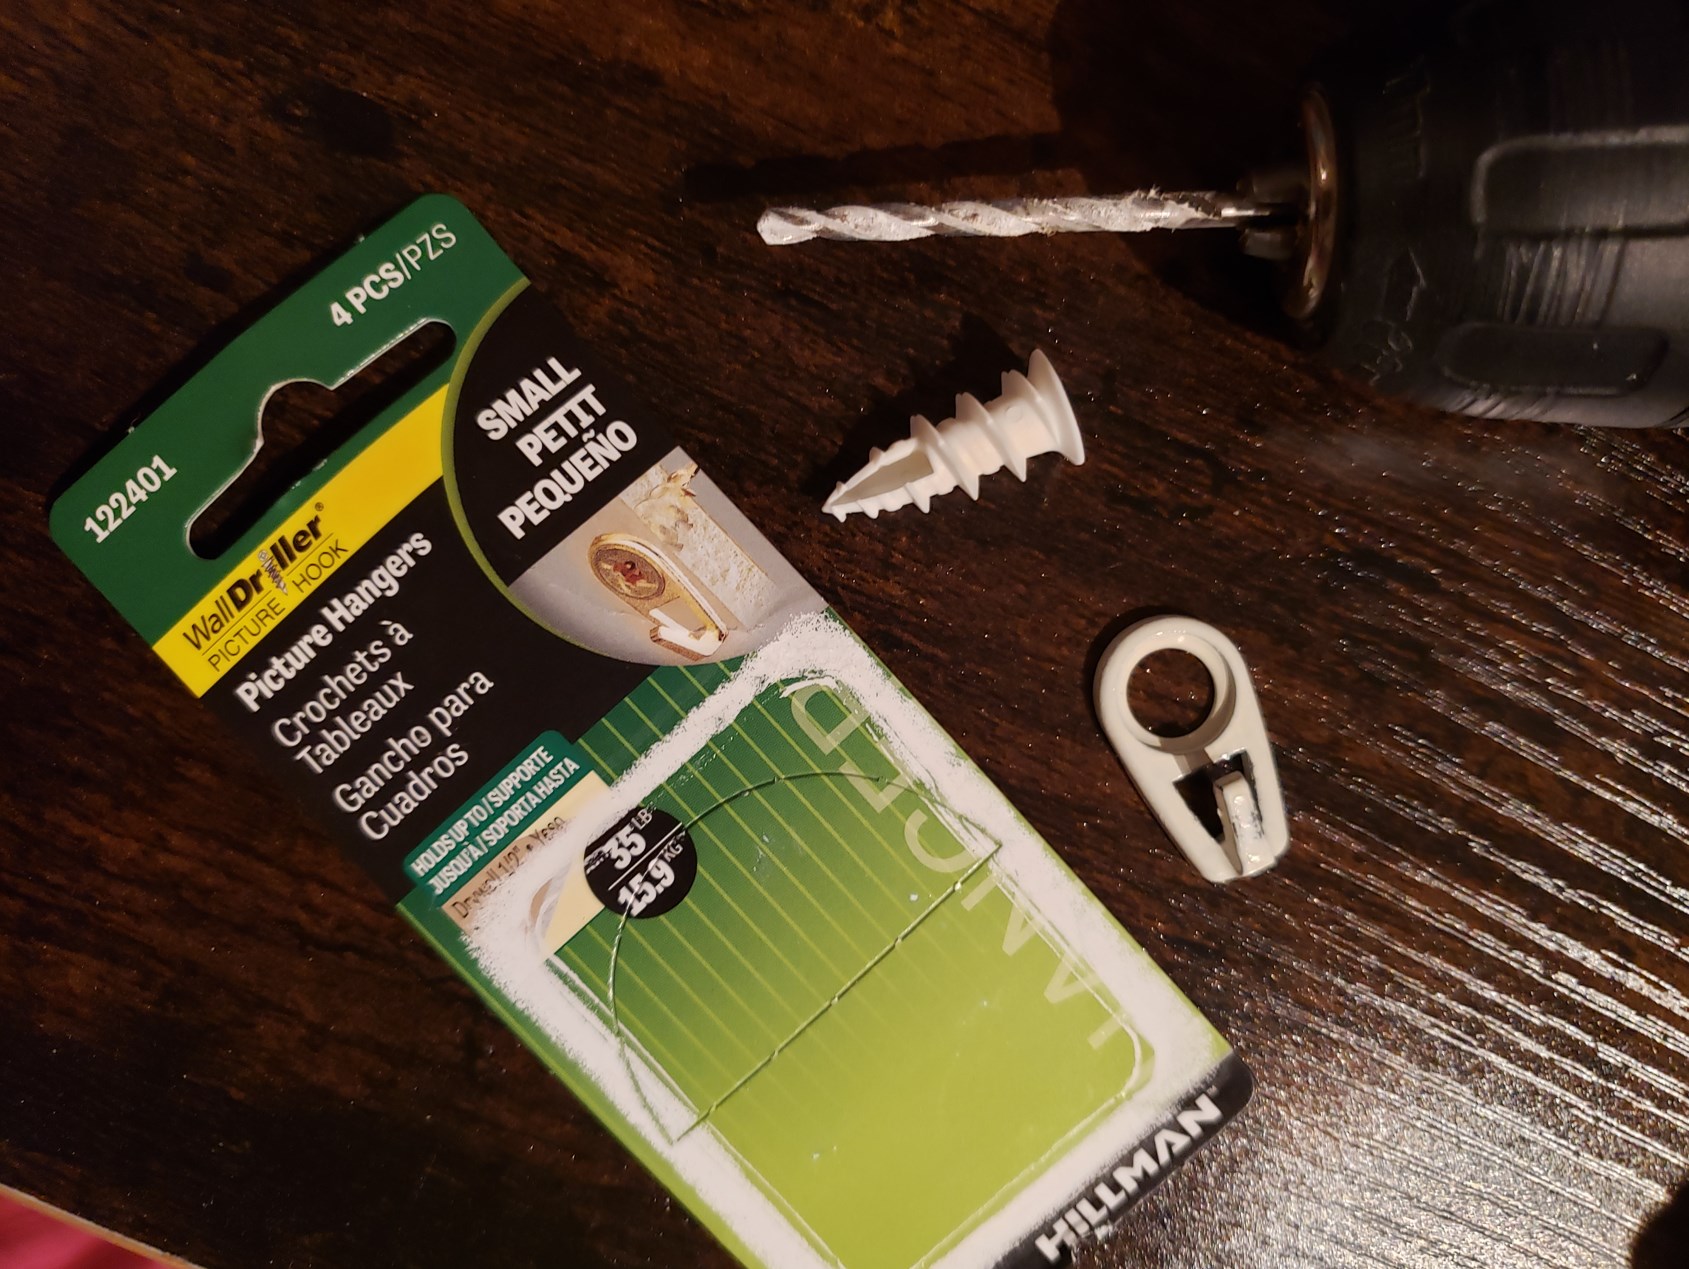

To make the two anchors parallel to each other, measure FROM THE FLOOR at the two locations and make sure you have the same measurement.
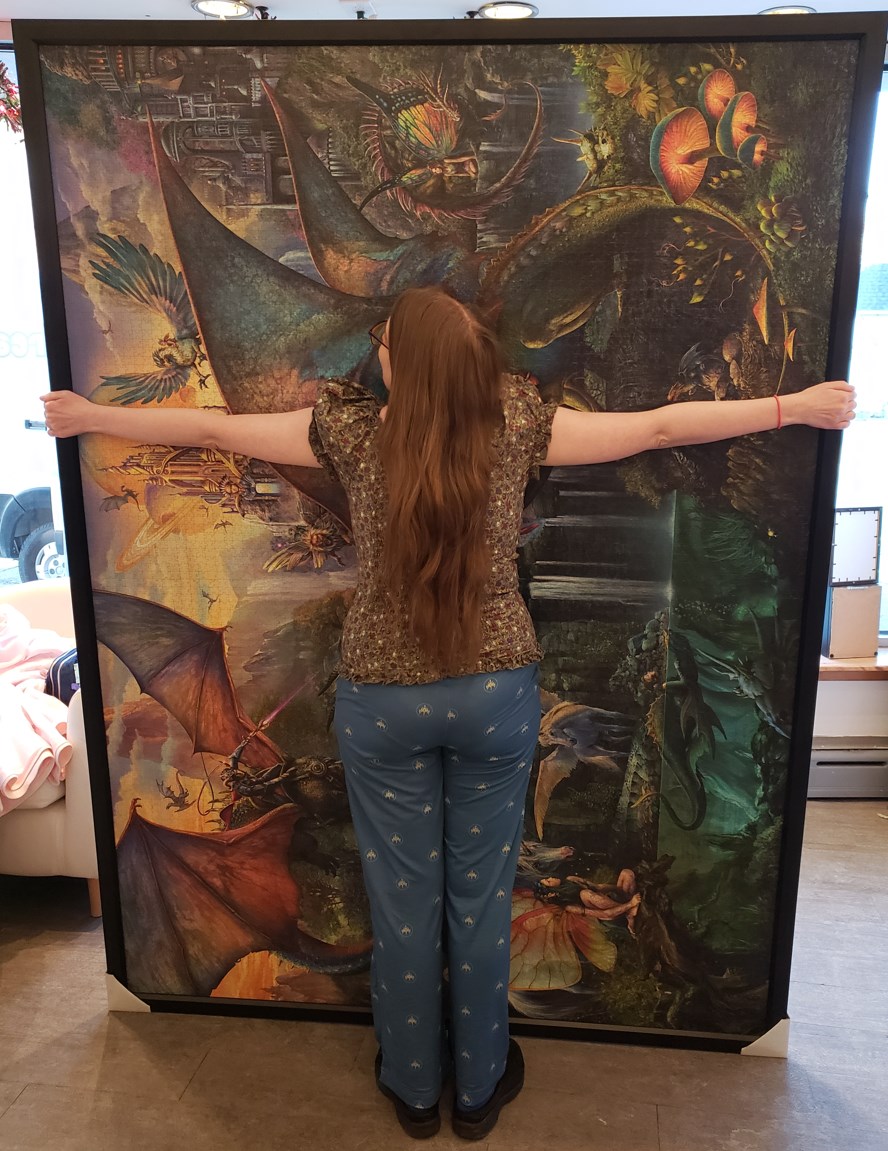
Look how pretty my puzzle is
This is at the frame shop before I brought it home.
It’s (significantly) bigger than I am!
-
This puzzle comes in two separate bags of 4500 pieces each. A lot of people, therefore, do two 4500-piece puzzles and then put them together at the end. I mixed them together immediately and did a 9000-piece puzzle. ↩︎
-
Don’t worry, I would NEVER glue Lego bricks. ↩︎
-
I used to have a poster of the Sistine Chapel thumbtacked to the ceiling in my bedroom when I was growing up. Next to it (and also on my ceiling) was an Exit sign. ↩︎
-
It seems a lot less important to seal a puzzle that’s on the ceiling than one that’s on a wall. ↩︎
-
I’ve been able to slide parchment paper under a 4000-piece puzzle with help (would not have been possible on my own), for 5000 pieces we did the second-piece-of-foam-board method. ↩︎